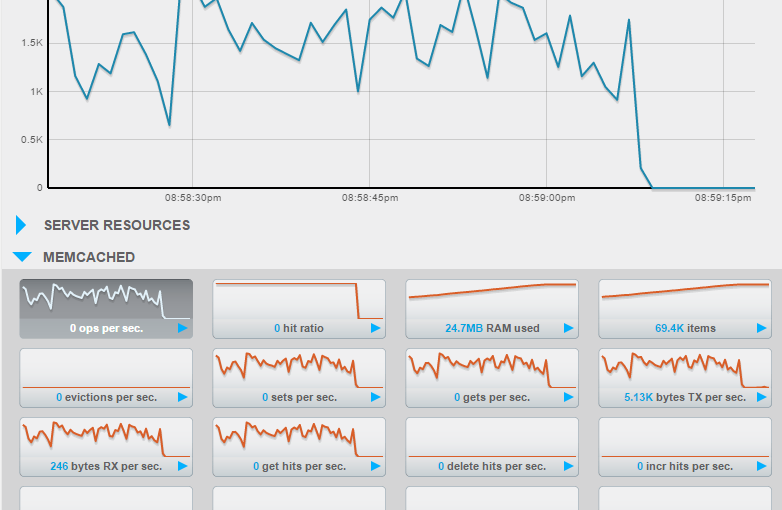
If you are storing ASP.NET session in webserver memory, then when a webserver dies, you lose all the sessions on that server. This results in poor customer experience, as they are logged out in the middle of some journey and has to log back in, losing their state, sometimes resulting in data loss. A common solution to avoid such problem is to store session outside the webserver. You can use a separate cluster of servers where you run some software that lets your application store session. Some popular technologies for storing session out-of-process are SQL Server, Memcached, Redis, NoSQL databases like Couchbase. Here I present some performance test results for an ASP.NET MVC 3 website using SQL Server vs Redis vs Couchbase. Continue reading Storing ASP.NET session outside webserver – SQL Server vs Redis vs Couchbase
Category: CodeProject
Build, deploy, anonymize config, zip package, git commit, push from a single command
 While working on open source projects, you have to frequently build your code, clean up all temporary files, remove your own passwords, connections strings from web.config, then create a binary deployment package in a zip format and then commit and git push to GitHub. Let’s automate all these using a configurable powershell script.
Here’s the full script.
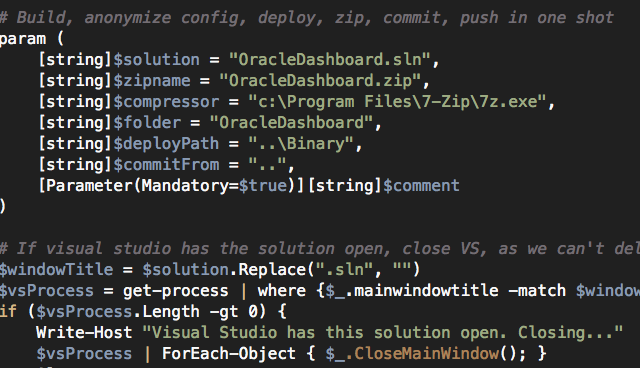
First step, let’s define the parameters for the script with some default values:
param (
    [string]$solution = "OracleDashboard.sln",
    [string]$zipname = "OracleDashboard.zip",
    [string]$compressor = "c:\Program Files\7-Zip\7z.exe",
    [string]$folder = "OracleDashboard",
    [string]$deployPath = "..\Binary",
    [string]$commitFrom = "..",
    [Parameter(Mandatory=$true)][string]$comment
)
Some description of these parameters:
- $solution = path of the solution file relative to the script location
- $zipname = name of the zip file.
- $compressor = 7-zip’s 7z.exe file path.
- $folder = the folder that contains the code, which is zipped.
- $deployPath = relative path where the zip file will be moved to.
- $commitFrom = relative path where the script will run git commit and git push from.
- $comment = A comment for the git commit.
The first thing the script does is look for the solution open in Visual Studio and close it. You can comment this section out if you want. But if Visual Studio is open, then /obj folder cannot be deleted.
# If visual studio has the solution open, close VS, as we can't delete obj folder while it is open
$windowTitle = $solution.Replace(".sln", "")
$vsProcess = get-process | where {$_.mainwindowtitle -match $windowTitle -and $_.ProcessName -eq "devenv"}
if ($vsProcess.Length -gt 0) {
    Write-Host "Visual Studio has this solution open. Closing..."
    $vsProcess | ForEach-Object { $_.CloseMainWindow(); }
    Sleep 5
    Read-Host "Press ENTER to proceed if Visual Studio is closed"
    $vsProcess = get-process | where {$_.mainwindowtitle -match $windowTitle -and $_.ProcessName -eq "devenv"}
    if ($vsProcess.Length -gt 0) {
        Write-Host "Visual Studio still has the solution open. Aborting."
        Return
    }
}
Next step is to do some spring cleaning:
Push-Location

if (Test-Path $zipname) { rm $zipname; }

# Clean up deploy folder
rm $deployPath\*.* -Force -Recurse
First remember the current path. We have to come back to this path after we are done. Then remove the zip file if it already exists. Then cleanup the $deployPath. You can remove this if you want to keep old deployment packages. Then you have to handle generation of unique file names for the packages.
Now, let’s build and remove /obj folder:
# Build new version
msbuild /verbosity:minimal $solution

# Delete obj
if (Test-Path $folder\obj) { rm $folder\obj -Force -Recurse }
Next step: remove all sensitive information from the web.config, which includes connection strings, authorization block, appSettings entries etc. This is all up to you to customize:
# backup the web.config and remove sensitive entries before pushing to git, eg connectionString
[string]$filename = gi $folder\web.config
[string]$backup = [System.IO.File]::ReadAllText($filename)
$xml =
[xml][/xml]
$backup $xml.PreserveWhitespace = $true foreach($n in $xml.configuration.connectionStrings.add) { $n.ParentNode.RemoveChild($n); } # Anonymize any sensitive appSettings entry foreach($n in $xml.configuration.appSettings.add) { switch($n.key) { "Password" { $n.value = "Password" } } } # Remove authorization blocks $xml.configuration.'system.web'.authorization.RemoveAll() $xml.Save($filename)
Finally, let’s run some regular expression check to ensure the web.config does not have any sensitive information left accidentally. Again, this is all up to you to customize.
# verify if web.config still contains any sensitive info
[string]$config = gc $folder\web.config
if ( ($config -match 'connectionString="\w+') -or ($config -match 'users="\w+') ) {
    Write-Host "Configuration file is not cleaned."
    # Restore web.config
    [System.IO.File]::WriteAllText($filename, $backup)
    Exit
}
Now time to compress the source folder and create a zip file using 7-zip.
# Compress the solution folder and copy to deploy folder
cmd /c $compressor a -tzip $zipname $folder -r
cmd /c copy $zipname $deployPath /Y
cmd /c del $zipname
Finally git commit and push:
# Commit and push to GitHub
cd $commitFrom
git pull
git add -A *.*
git commit -a -m $comment
git push
Pop-Location
And last step is to restore your own web.config, that was anonymized:
# Restore web.config
[System.IO.File]::WriteAllText($filename, $backup)
That’s it. Now all you have to do is, just hit ./gitpush.ps1 from Powershell command line and you are done!

Google Docs to clean html, good for WordPress posts, emails
WARNING! It appears Google Docs has changed and this script no longer works.
Google docs is a great platform to write documents, especially when you compare it with the WordPress editor. It would be good to have a clean way to export a Google doc to a wordpress post or generate nice looking emails. If you copy and paste a Google doc into a WordPress post, it loses many formatting and produces a bloated html with lots of inline style, CSS classes that do not go well with WordPress. So, here’s a solution that will generate a clean HTML from a Google Doc and email it to you so that you can copy and paste it a WordPress post or send to others via email.
For example, here’s a Google Doc:
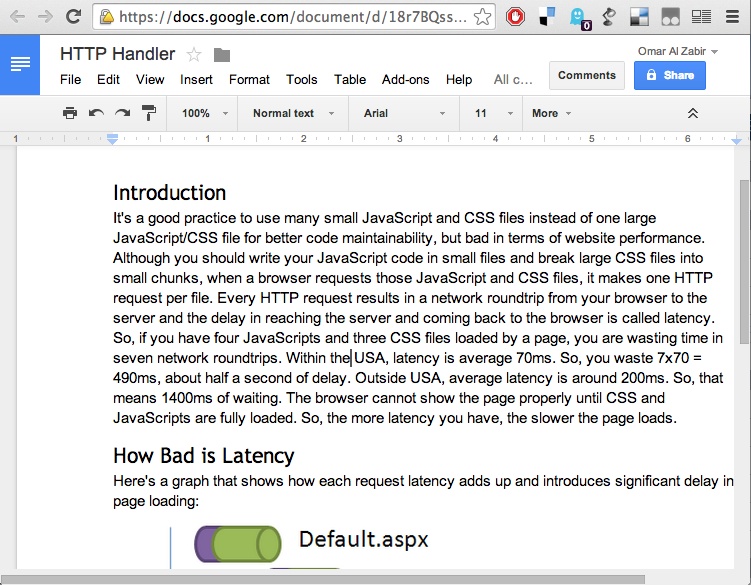
Once you run the script, it will produce a nice clean email for you:
Here’s how to do it:
- Open your Google Doc and go to Tools menu, select Script Editor. You should see a new window open with a nice code editor.
- Copy and paste the code from here: GoogleDocs2Html
- Then from the “Select Editor” menu, choose ConvertGoogleDocToCleanHtml
- Click the play button to run the script.
- You will get an email containing the HTML output of the Google Doc with inline images.
- You can easily forward that email to anyone or copy and paste in a WordPress post.
Here’s how the code works:
First it will loop through the elements (paragraph, images, lists) in the body:
function ConvertGoogleDocToCleanHtml() {
  var body = DocumentApp.getActiveDocument().getBody();
  var numChildren = body.getNumChildren();
  var output = [];
  var images = [];
  var listCounters = {};

  // Walk through all the child elements of the body.
  for (var i = 0; i < numChildren; i++) {
    var child = body.getChild(i);
    output.push(processItem(child, listCounters, images));
  }

  var html = output.join('\r');
  emailHtml(html, images);
  //createDocumentForHtml(html, images);
}
The processItem function takes care of generating proper html output from a Doc Element. The code for this function is long as it handles Paragraph, Text block, Image, Lists. Best to read through the code to see how it works. When the proper html is generated and the images are discovered, the emailHtml function generates a nice html email, with inline images and sends to your Gmail account:
function emailHtml(html, images) {
  var inlineImages = {};
  for (var j=0; j<images.length; j++) {
    inlineImages[[images[j].name]] = images[j].blob;
  }

  var name = DocumentApp.getActiveDocument().getName()+".html";

  MailApp.sendEmail({
     to: Session.getActiveUser().getEmail(),
     subject: name,
     htmlBody: html,
     inlineImages: inlineImages
   });
}
Enjoy!
Remember images in the email are inline images. If you copy and paste into WordPress, the images won’t get automatically uploaded to WordPress. You will have to manually download and upload each image to WordPress. It’s a pain. But that’s the problem with WordPress editor.
Special thanks to this GitHub project, that gave me many ideas: https://github.com/mangini/gdocs2md

How to setup a rock solid VM on Windows Azure for your WordPress blogs
Windows Azure is offering Extra Small Virtual Machines (1 vCPU, 768 MB RAM) at $9/mo, free for first 3 months. Yes, you read it right. You can get a Windows VMs at $9 (until May 31st) and Linux VMs at $15, at the same rate as Amazon Micro Instance, which is free for first year (boo Microsoft!). However, MSDN Ultimate subscribers get 1500h worth of Small VM hours for free! It is a good time to grab a VM or two and setup your own servers, where you can host your own blog and showcase your awesome open source projects. VMs are your own mini server, where you get full remote desktop access and do whatever you like. You don’t have to be limited to a web based control panel. It’s your own baby server on the cloud, fully scalable and redundant.
In this article, I will show you show to setup a rock solid Linux instance and configure some useful security and maintenance features:
- Tune Apache, MySql, PHP to run within an Extra Small VM within the memory limits.
- Secure your server from common brute force attacks.
- Harden a WordPress instance and make it resilient to common failures.
- Optimize your website for maximum client side caching and improve page load time.
- Some handy Linux scripts and cron jobs that can take care of your server most of the time, identifying and fixing common problems and let you have your peace of mind.
This article is written from a Windows user point of view, who has never used Linux before. So, Linux gurus, don’t roll your eyes at me.
Create a Linux VM

Let’s first create a new Ubuntu server.

The admin user name on the Linux server is testadmin. We will use this to login to the Linux server.
Let’s select the “Provide Password” option instead of “Upload SSH key” to make the configuration simpler. If you use password option, then every time you login to the Linux VM using Putty (a client for working on Linux servers remotely from Windows), you will have to enter username and password. But if you use the certificate option, you won’t have to enter password always. It is definitely the better way to do it, but it is just a lot of extra steps to configure it. For simplicity, let’s ignore this for now.

Let’s name the server and choose a location where you want the server. You should choose a location where most of your users are going to come from. If you are hosting sites for Asia, do choose an Asian location. You will get much better website load performance because the network roundtrip time from your users computer to the server will be significantly lower.


Once the VM is created, it will look like this:

Go to the “Endpoints” tab, and see the public port that has been opened for SSH. SSH is the Remote Desktop Protocol (RDP) equivalent for Linux.

So, the server’s DNS is ubuntu23052013.cloudapp.net and SSH public port is 54423.
Connect to the VM
Let’s get Putty and configure it to connect to this VM:

Put the DNS and the port. Then put a name on “Saved Sessions” and click Save. Then go to “Appearance” and change the font to Consolas, 15. Come back to this, and click “Save” again.
Now click “Open” and you will be taken to the remote session on the server. You will be asked to accept the server, just click Yes. Then use testadmin as username and the password you have configured while creating the VM.

Congratulations! You are now into a Linux server. Don’t be shocked, there’s no graphical client like Windows Remote Desktop. It is all command line based console. But you will be amazed how quickly you can get things done on Linux via command line. Windows Command Line isn’t even remotely close to being as powerful as Linux.
First, we will go to elevated command line, using the linux “sudo su” command.

When you see “root@Test”, that means you are in “root” mode (Windows equivalent of Administrator privilege).
Setup upgrade
Let’s do a quick check to see if there’s any upgrade pending. Run the command “do-release-upgrade”.
root@Test:/home/testadmin# do-release-upgrade
Checking for a new Ubuntu release
No new release found
Best to do the upgrade first before you configure anything.
By the way, you can copy some text and paste it into Putty by just right clicking on the Putty window.
Now let’s setup automatic security patch installation by running this command.
unattended-upgrade
Add swap file to get virtual memory
Linux VM doesn’t come with Swap file. That means you only have the 768 MB RAM to play with. If by any chance any application exceeds the RAM, it crashes. So, you need to add a swap file so that you get plenty of virtual memory to play with.
Run the command “swapon –s” to check if there’s any swap file. If none, it will look like this:
root@Test:/home/testadmin# swapon -s
Filename                                Type            Size    Used    Priority
root@Test:/home/testadmin#
Let’s create one:
dd if=/dev/zero of=/swapfile bs=1024 count=512k
This will create a 512 MB empty file.
You should see an output like this if everything works out:
root@Test:/home/testadmin# dd if=/dev/zero of=/swapfile bs=1024 count=512k
524288+0 records in
524288+0 records out
536870912 bytes (537 MB) copied, 20.4811 s, 26.2 MB/s
Now run these two commands to make that file the swap file:
mkswap /swapfile
swapon /swapfile
Let’s check again if the swap file is now working:
root@Test:/home/testadmin# swapon -s
Filename                                Type            Size    Used    Priority
/swapfile                               file            524284  0       -1
Now the swap file is there and turned on.
Now the problem is, when you VM will reboot, the swap will be gone. So, to make the swap permanent, we need to do something more.
nano /etc/fstab
This will open a text editor which should look like this:

Welcome to the world of Text based computing! This is usually a shocker for Windows users. There’s no Notepad guys.
Now, go to the end of the file and add this line:
/swapfile none swap sw 0 0
It will then look like this:

Now here’s the awesome thing. How do you save and exit?
Press Ctrl X, then Y, then ENTER. Yes, it is not Windows. It takes a while to get used to it.
After exiting, run this command:
chown root:root /swapfile
chmod 0600 /swapfile
This will set proper permission to the swap file.
Now let’s reboot and make sure the swap file is there.
reboot
After the system is back and you have logged back in and run the “sudo su” command to get into root access, run “swapon –s” to check if the swap is working.
You can also use “free” to see how much RAM and swap is getting used. It is a very handy command to check if your server is suffering from memory issue:

It shows swap is there for use.
Install LAMP stack
LAMP means Linux, Apache, Mysql and PHP. That’s the pre-requisite for getting WordPress to run.
Run these two commands:
apt-get install tasksel
tasksel
It will start a Wizard to configure the LAMP server and install all the stuff it needs.

Select LAMP.
You should be asked for password for the MySQL root user account:

Once it is complete, you should have a LAMP stack ready and there will be a webserver running that you can test.
You need to open the HTTP port 80 on your VM from Azure firewall:

Go to Endpoint and create a new endpoint and map port 80.
Wait at least 5 mins after Azure says it is done. I could not hit the site immediately after getting complete message. I had to wait for some time.
Now, the moment of truth:
http://ubuntu23052013.cloudapp.net/

The web folder is at /var/www. This is the equivalent of c:inetpubwwwroot in Windows.
You will find an index.html file there, which is what you see when you browser your server.

Let’s create a test.php file there to make sure PHP is working.
nano test.php
Then put this into the file:
<?php phpInfo() ?>
Ctrl+X, Y, ENTER to get out of nano.
Now hit this file on browser:
http://ubuntu23052013.cloudapp.net/test.php
You should see this:

This means PHP is ready and you are now ready to install WordPress.
Tune MySQL to consume less memory
On an extra small VM, we have very limited RAM. So, we need to tune MySQL to use as little RAM as possible. So, we need to change the mysql config files to make some adjustments.
First, backup the config file.
cp /etc/mysql/my.cnf my-original.cnf
Now let’s make some changes. I usually change the following values:
# * Fine Tuning
#
key_buffer              = 1M
max_allowed_packet      = 1M
thread_stack            = 64K
thread_cache_size       = 8
innodb_buffer_pool_size = 1M
The last entry, innodb_buffer_pool_size may not be there. In that case, you will have to add that line. All of these lines are inside the [mysqld] section. Make sure you put them inside the [mysqld] section and not after any other section.
You need to use nano to open the /etc/mysql/my.cnf file and make these changes.
Install SMTP server
You need to install a SMTP server in order to send email from your server. Postfix is the name of the server. Here’s how to install this:
apt-get install postfix
You should see a config screen:

Then you will be asked to put the fully qualified DNS for your website. If you are finally planning to host your site on a domain like example.com, then put that here. Or you can put the Azure DNS for now and later on add your final domain in the Postfix config file.

Let’s test sending email. First install a mail utility to send email:
apt-get install mailutils
Once it is installed, test sending an email:
echo "Test mail from postfix" | mail -s "Test Postfix" youremail@email.com
You should receive an email. if not, then Gmail doesn’t accept mails from your server. If you aren’t receiving email, then check the last entries from the log file to see what’s wrong:
tail /var/log/mail.log
Configure a website to be served on a domain
Say you have a website, example.com to be served from your server. You need to create something called “Virtual Host” in Apache’s term. It is equivalent to IIS Website.
First create the folder where all the files for the website will reside:
mkdir -p /var/www/example.com/public_html
chown -R $USER:$USER /var/www/example.com/public_html
chmod -R 755 /var/www
cp /etc/apache2/sites-available/default /etc/apache2/sites-available/example.com
The last line creates a sample configuration for the website. Then edit the /etc/apache2/sites-available/example.com file to configure the virtual host with the correct configuration using nano:
nano /etc/apache2/sites-available/example.com
After editing the file will look like this:

First you add the ServerName and ServerAlias. Then you change the DocumentRoot from /var/www to the /var/www/example.com/public_html
Then you change the three occurrences of AllowOverride to AllowOverride All. This will come handy when we will setup a .htaccess file.
Now enable the website:
a2ensite example.com
a2dissite 000-default
Now let’s install some modules that you will need to boost site performance and enable caching.
a2enmod rewrite
a2enmod headers
a2enmod expires
Finally, restart Apache.
service apache2 restart
If you see a warning message like this:
* Restarting web server apache2
 apache2: Could not reliably determine the server's fully qualified domain name, using 100.88.124.9 for ServerName
Then open the apache config file:
nano /etc/apache2/apache2.conf
And add this line:
ServerName example.com
Then try restarting apache again. It should fix the problem.
Let’s verify the site is configured properly. Run this command:
grep -R AllowOverride /etc/apache2
You should see the output should contain these three lines:
/etc/apache2/sites-enabled/example.com:         AllowOverride All
/etc/apache2/sites-enabled/example.com:         AllowOverride All
/etc/apache2/sites-enabled/example.com:         AllowOverride All
This means the site is now enabled (as it is in sites-enabled folder) and the AllowOverride is done properly.
Now we need to create a file on the virtual host (website) and see if the site works:
nano /var/www/example.com/public_html/index.html
Put something there and then hit the URL.
Before hitting URL, you need to put the Public IP of the server in your local PC’s hosts file. In Windows, it is c:WindowsSystem32driversetchosts. You should add something like this:
137.117.135.68 example.com
Now you can hit the http://example.com on browser and it should show:

This means we have got virtual host configured. Now you just have to map your domain to the IP of the VM.
Install WordPress
Now we will install the WordPress engine. First go to your /home/testadmin directory and then run the following commands.
cd /home/testadmin/
wget http://wordpress.org/latest.tar.gz
tar -xzvf latest.tar.gz
cp ./wordpress/wp-config-sample.php ./wordpress/wp-config.php
Now create a MySQL database for wordpress:
mysql -u root -p
Enter the password you used while installing LAMP.
Then run these commands in the MySQL command prompt:
create database wordpress;
GRANT SELECT, INSERT, UPDATE, DELETE, CREATE,
  DROP, INDEX, ALTER, CREATE TEMPORARY TABLES,
  LOCK TABLES ON wordpress.*
  TO 'wordpress'@'localhost'
  IDENTIFIED BY 'Wordpress123';
FLUSH PRIVILEGES;
This will create a database named wordpress, then create a database user named wordpress with password WordPress123 and give permission to that wordpress database. To confirm the user can access the database, quit from mysql command prompt and try to login using the wordpress user account:
mysql -u wordpress -p wordpress
If this works, then you have created the wordpress database and user properly.
Now we need to configure the WordPress config file:
nano ./wordpress/wp-config.php
There are 3 entries to fix:

Ctrl X, Y, ENTER out of nano.
Now copy the whole wordpress folder to the virtual host folder:
cp -r ./wordpress/* /var/www/example.com/public_html/
cd /var/www/
chown www-data:www-data * -R
usermod -a -G www-data testadmin
In the last line, we have the admin user name. Make sure you have got it right.
Remove the index.html file and your wordpress will be up and running.
rm /var/www/example.com/public_html/index.html

Do the configuration. Change the “admin” user to something else. You will be saved from many brute force attacks.
Tuning wordpress installation
In Apache, there’s something called .htaccess file, where you can define site specific settings like – caching of static files, handling 404, rewriting URL etc.
I have created a .htaccess file that is suitable for wordpress and ensures site produces properly cached static files and handles 404 properly. You can get the file content here:
https://gist.github.com/oazabir/5637290
It also makes WordPress support extensionless URL for posts.
Copy the raw content and then create a .htaccess file in the public_html folder and paste it:
nano .htaccess
Right click on nano and the content will be pasted. Ctrl X Y ENTER out of nano.
Make sure your wordpress site is still running. If not, then you have incorrectly copied .htaccess file content.
Install some essential WordPress plugins
You should install the following plugins:
- WP Security Scan
- BackWPup
- Configure SMTP
- Jetpack by WordPress.com
Just copy and paste these names into the search box while adding new plugin.
Monitoring traffic on Apache
Apachetop is an awesome tool that shows you traffic hitting your website in near real time. Install it using:
apt-get install apachetop
Then run apachetop and you will see traffic like this:

Checking for missing and failing URLs
You should regularly check for 404 and 500 errors on your website. This will help you identify missing links and correct those links on your WordPress posts. HTTP 500 pages will give you an indication what is failing on your website and whether you are under some attack.
tail -n 10000 /var/log/apache2/access.log | awk '($9 !~ /200|304/)' | awk '{print $9,$7}' | sort | uniq
This will process the last 10k lines from the Apache access log (equivalent to IIS website log) and show you URLS which aren’t 200 and 304. It’s a good starting point to check which URLs are failing and fix them one by one.
Detect site failure and auto restart webserver
You can create a cron (equivalent to Windows Task Scheduler) to run say every 10 minutes and check if your site is still running. If not, it will restart Apache and MySQL.
FILE=/home/siteup.log
SITE=http://quranerkotha.com
SIZE=`stat -c %s $FILE`

# Delete the file if it is over 1MB already
if [ $SIZE -ge 1000000 ]; then
	rm FILE
fi

# IF the site doesn't response within 15 sec, time to kill apache and mysql
if wget --timeout=15 --read-timeout=15 -O /dev/null -q $SITE
then
	echo "Site is up" >> $FILE
	date >> $FILE
else
	echo "Site is down" >> $FILE
	date >> $FILE
	/usr/bin/killall apache2 >> $FILE
	/usr/sbin/service mysql restart >> $FILE
	/usr/sbin/service apache2 restart >> $FILE
	wget --timeout=30 --read-timeout=30 -O /dev/null -q $SITE
fi
Save this in a file inside the /home/testadmin folder. Say the file name is “checksite”.
First, you need to give this file execute permission. In Linux, you can’t just write a batch file like file and run it. You have to give that file execute permission.
chmod +x checksite
Now you can test the file by running ./checksite command.
If it is running fine, then let’s setup a cron which will make this script run every 10 minutes.
Run:
crontab -e
This will open a sample file. Go to the end of the file and put these lines:
SHELL = /bin/bash
PATH = /usr/bin/:/bin:/usr/sbin
*/10 * * * * /home/testadmin/checksite >> $HOME/uptime.log 2>&1
Save the file and exit. Wait for 10 minutes. It should run the script and produce a file in /root/uptime.log folder.
You can view the content of the file using cat command.
cat /root/uptime.log
This will show you if the site was down at some time.
Detect rogue process and kill them automatically
Sometimes there might be some process that keeps consuming 100% CPU all the time and brings down your server. Sometimes it happens to Apache process if you are under attack and the attacker has found a way to hit som expensive page that consumes high CPU. In that case, you will need some automatic way to kill top CPU consuming process and recover the server. Here’s a script to do that:
#!/bin/bash

CPU_LOAD=$(uptime | cut -d"," -f5 | cut -d":" -f2 | cut -d" " -f2 | sed -e "s/$
CPU_THRESHOLD=100

if [ $CPU_LOAD -gt $CPU_THRESHOLD ] ; then
  echo $CPU_LOAD exceeded threshold
  ps -eo pcpu -eo cmd | head -n 5
  kill -9 $(ps -eo pid | sort -k 1 -r | grep -v PID | head -n 1)
  echo Top process killed
  CPU_LOAD=$(uptime | cut -d"," -f4 | cut -d":" -f2 | cut -d" " -f2 | sed -e "s$
  echo CPU load after kill $CPU_LOAD
fi

exit 0
Save this file and use chmod to give it executable permission. Then use crontab –e command to add the following line:
*/10 * * * * /home/testadmin/killtop >> $HOME/killtop.log 2>&1
It will run this script every 10 minutes and the script checks if the server has been consuming 100% CPU on average in last 10 minutes. If it is, then it will find the top CPU consuming process and kill it.
Now the CPU_THRESHOLD value needs some discussion. The “100% utilization” mark is 100 on a single-core system, 200, on a dual-core, 400 on a quad-core, etc. This article has a very nice discussion on this.
Tuning PNG, JPEG for faster site load performance
You can use OptiPNG and JpegTran, two utlities to heavily compress PNG and JPEG files in your website. Sometimes these tools save 70% file size.
First install these tools:
apt-get install opting
apt-get install libjpeg-progs
Now use this command to compress all files inside your web directory. You need to first get into the web directory and run these commands:
cd /var/www/example.com/
find . -type d -exec sh -c "cd "{}" && pwd && optipng -o7 *.png" \;
find . -name '*.jpg' -exec jpegtran -optimize -verbose -outfile {} {} \;
You can save these commands in a script file and run the periodically. They will take a very long time to run, but they might save a lot of download bandwidth on your website and increase your page load performance significantly.
Protecting your website from brute force attack
Someone can write a simple script to continuously hit your virtual server and consume 100% CPU on the server. VMs aren’t as powerful as physical servers. So, they run out of capacity pretty quickly, epecially Extra Small VMs. So, you need to install mod_evasive module in Apache to prevent someone from continuously hitting your website and consume all available system resource.
First install the module:
apt-get install libapache2-mod-evasive
Now you need to create a log folder where the blocked IPs will be logged:
mkdir /var/log/apache2/mod_evasive
chown www-data:www-data /var/log/apache2/mod_evasive
Open the mod_evasive configuration file at
/etc/apache2/mods-enabled/mod-evasive.conf
and put this:
<ifmodule mod_evasive20.c>
   DOSHashTableSize 3097
   DOSPageCount  1
   DOSSiteCount  20
   DOSPageInterval 10
   DOSSiteInterval  10
   DOSBlockingPeriod  60
   DOSLogDir   /var/log/mod_evasive
   DOSEmailNotify notify@email.com
   DOSWhitelist   127.0.0.1
</ifmodule>
This is a *VERY* restrictive setting. It will only allow someone to hit the same page on your blog site once every 10 seconds. I started with the default settings, but my site was going down from some brute force attack or some crawler, which was continuously hitting some page on my site. So, I kept lowering it down to this value. It’s been 3 days. So, far no downtime.
Conclusion
In this article, we have learnt you to setup a Linux VM in Windows Azure. We have also learnt how to install LAMP, configure and tune Apache, MySQL, WordPress. We have learnt some handy tricks to monitor the server, do regular housekeeping and also setup some automated job that can save you from waking up at 3 AM in order to recover your server.
Using custom font without slowing down page load
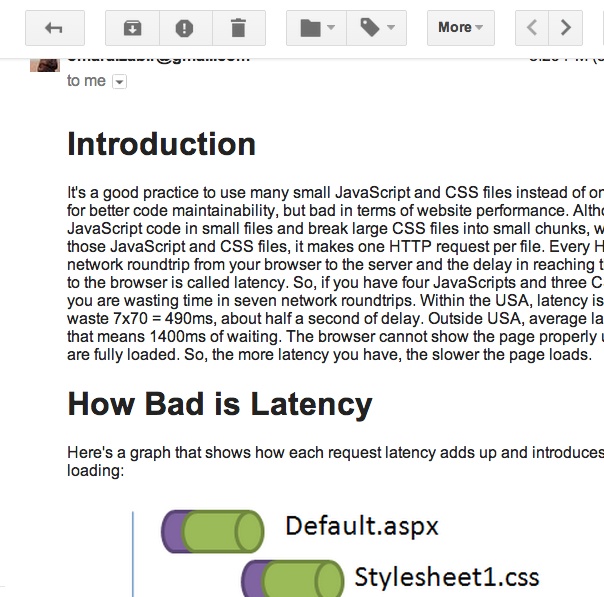
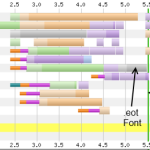
Custom fonts are widely used nowadays to give your websites trendy look, but at the great expense of page loading speed. Each custom font has to be downloaded, initialized and applied throughout the page before browser can render anything. If you have a custom font in any CSS, anywhere on the page, most browsers (like IE) will not render anything (remain white) until the custom font is downloaded, initialized and applied. Usually custom fonts are over 300KB. As a result, they significantly slow down page load speed. See this timeline of a website that uses custom font:

The gray bar is the .eot font. The green vertical bar is when browser renders the page. Until that green bar, user is staring at a white page with absolutely nothing for 5.5 seconds. The .eot is the very last thing browser downloads before it can render anything on the page. Usually 5.5 second page load time is unacceptable for most websites because on an average 40% users abandon your site if it does not load in 3 seconds!

The above graph shows you that nearly 80% change in bounce rate for pages that have over 4 second page load time!
It is absolutely key that you maintain less than 4 sec home page load time. Browser cannot remain blank for more than 4 sec. Ideally the page should be fully loaded within 4 sec if you want to encourage users to come back to your site.
Let’s learn a trick that you can use to download custom fonts behind the scene, without preventing browser from rendering anything and then apply the font as soon as the font is downloaded. Once you apply this trick, browser will render the page before the custom font is downloaded:

As you see here, browser has rendered the page on 4th second before it has downloaded the custom font file. The font takes a long time to downloading. During this whole time, browser is free, content is rendered, user can scroll around. Once the font is downloaded, it is applied. It freezes from 8.5 sec till 9.5 second while it initializes the font and applies on the page.
Step 1: Create a CSS that loads the custom font
First create a css that will load the custom font and apply to the html elements. First create a IE version of the CSS:
@font-face{
  font-family:'Nikosh';
  src: url('nikosh2.eot'); /* here you go, IE */
}

p, li, input, select, div, span, em, i, b, u, strong {
    font-family: 'Nikosh', Arial, Helvetica, sans-serif;
}
IE only supports Embedded True Type font (.eot). It does not support TTF, OTF, WOFF.
Other browsers do not support .eot. So, for them, you need to use some other open format. Say you are using OTF:
@font-face{
  font-family:'Nikosh';
  src: url('nikosh2.otf') format('opentype');
}

p, li, input, select, div, span, em, i, b, u, strong {
    font-family: 'Nikosh', Arial, Helvetica, sans-serif;
}
This one IE won’t understand. So, you need two different CSS files. I understand there’s this bullet-proof font face hack which is claimed to work in all browsers. But I have tried it and it does not work in Chrome. Chrome does not understand the url(://) hack.
Step 2: Javascript to pre-cache the font file and download the CSS after font is loaded
Next step is to pre-cache the font file behind the scene so that browser is not frozen while the large custom font file downloads. You can use jQuery to download the font file.
var fontFile = jQuery.browser.msie ? '/wp-content/uploads/font/nikosh2.eot'
    : '/wp-content/uploads/font/nikosh2.otf';
var cssFile = jQuery.browser.msie ? '/wp-content/uploads/font/nikosh2ie.css'
    : '/wp-content/uploads/font/nikosh2nonie.css';

jQuery(document).ready(function(){
	jQuery.ajax({
	  url: fontFile,
	  beforeSend: function ( xhr ) {
		xhr.overrideMimeType("application/octet-stream");
	  }
	}).done(function (data) {
		jQuery("	")
		  .appendTo(jQuery('head'))
		  .attr({type : 'text/css', rel : 'stylesheet'})
		  .attr('href', cssFile);
	});
});
First it pre-caches the right font file based on browser version. Make sure you define the correct font file name here as you have defined in the browser specific css file. Once the file is downloaded, jQuery done will fire and then it will inject a link that tag will fetch the css. The css will refer the exact same font file, from the exact same location. So, browser will not download it again as it has just downloaded the file and cached in local cache. Thus the css will be applied immediately.
Remember, as soon as the <link> tag is added, browser will freeze and become white until the font is initialized and applied. So, you will some freezing here. As it is freezing after the page has loaded completely, user is at least looking at the page and thinks that the page has finished loading. So, the user experience is better.
Step 3: Enable static content expiration
For this to work, you must have static content expiration in the webserver. If you don’t have it then browser will not cache the font file and it will download the file again as soon as you add the <link> tag. In order to enable static content expiration, follow these steps:
- Click on the website in IIS.
- Click on “HTT Response Headers” icon.
- Click on “Set Common headers” from the right side menu.
- Turn on “Expire Web Content” and set a far future date.

This will turn on browser caching for all static files, not just font file.
Step 4: Set MIME type for fonts
IIS 7 or 8 does not come with MIME settings for .otf, .ttf etc font extensions. Only .eot is there. So, you need to set the MIME type for these extensions, otherwise it won’t deliver the font and browser will get a 404.3.
- Click on the website on IIS.
- Select “MIME Types” icons.
- Click Add…
- Add the .otf and .ttf extensions.
- Set Content Type as: application/octet-stream
That should now enable custom fonts on your webserver.
ReadLine on Binary Stream
When you are reading data from a binary stream, like NetworkStream or FileStream and you need to read both binary chunks as well as read one text line at a time, you are on your own as BinaryReader nor Stream supports ReadLine. You can use StreamReader to do ReadLine, but it does not allow you to read chunks of bytes. The Read(byte[], int, int) is not there on StreamReader.
Here’s an extension of BinaryReader for doing ReadLine over a binary stream. You can read both byte chunks, as well as read text lines at the same time.
public class LineReader : BinaryReader
{
  private Encoding _encoding;
  private Decoder _decoder;

  const int bufferSize = 1024;
  private char[] _LineBuffer = new char[bufferSize];

  public LineReader(Stream stream, int bufferSize, Encoding encoding)
    : base(stream, encoding)
  {
    this._encoding = encoding;
    this._decoder = encoding.GetDecoder();
  }

  public string ReadLine()
  {
    int pos = 0;

    char[] buf = new char[2];

    StringBuilder stringBuffer = null;
    bool lineEndFound = false;

    while(base.Read(buf, 0, 2) > 0)
    {
      if (buf[1] == 'r')
      {
        // grab buf[0]
        this._LineBuffer[pos++] = buf[0];
        // get the 'n'
        char ch = base.ReadChar();
        Debug.Assert(ch == 'n');

        lineEndFound = true;
      }
      else if (buf[0] == 'r')
      {
        lineEndFound = true;
      }
      else
      {
        this._LineBuffer[pos] = buf[0];
        this._LineBuffer[pos+1] = buf[1];
        pos += 2;

        if (pos >= bufferSize)
        {
          stringBuffer = new StringBuilder(bufferSize + 80);
          stringBuffer.Append(this._LineBuffer, 0, bufferSize);
          pos = 0;
        }
      }

      if (lineEndFound)
      {
        if (stringBuffer == null)
        {
          if (pos > 0)
            return new string(this._LineBuffer, 0, pos);
          else
            return string.Empty;
        }
        else
        {
          if (pos > 0)
            stringBuffer.Append(this._LineBuffer, 0, pos);
          return stringBuffer.ToString();
        }
      }
    }

    if (stringBuffer != null)
    {
      if (pos > 0)
        stringBuffer.Append(this._LineBuffer, 0, pos);
      return stringBuffer.ToString();
    }
    else
    {
      if (pos > 0)
        return new string(this._LineBuffer, 0, pos);
      else
        return null;
    }
  }

}
Enjoy.
Browse internet faster and save power using a smart HOSTS file
Internet is full of flash ads nowadays that make page load slower, render slower and consumes more CPU, thus power. If you can browse without having any flash ads or in fact any ads loaded and without any of the tracking scripts – you can browse much faster, scroll through pages much smoother and have more hours from your battery. Nowadays, most websites use scripts from various analytics sites that track your browsing habit, use IFRAME to load tracking and social networking widgets. All of these add considerable delay to page loading and make browser consume more CPU and bandwidth. If you can turn all of them off, browsing internet feels a lot smoother, faster and you get more work hours while running on battery.
Moreover, you don’t get distracted by the flashy ads and save your children and young family members from looking at foul things.
If we could get 10% of the total internet users (2bn as of Jan 2011) to save 10% CPU, power and bandwidth while browsing everyday, we could save mega watts of power everyday throughout the world!
Using this solution, you can prevent ads and tracking scripts, prevent malicious and porn websites.
How bad is it?
Let’s take an example on a popular website. The red boxes are Flash Ads (read power suckers).

Once we disable all ads and tracking scripts, here’s how it looks:

Statistics:
| Before | After | |
| Total Requests | 111 | 100 |
| Total Download Size | 1.2 MB | 0.98 MB |
| Page load time | 4.34s | 3.64 |
Not just during page loading, while you are on the page, doing nothing, just reading, browser continuously consumes CPU.
Before:

After:

Before disabling the ads and tracking scripts, CPU is always around 20-25%. After disabling it is around 8-10%. The more CPU works, the more power it consumes. If you are running on battery, you can get at least 20% more time from your battery. If you have many tabs open all the time, you can save more.
Here’s how to save CPU, bandwidth and power
Go to this website and download the HOSTS file:
http://winhelp2002.mvps.org/hosts.htm
Follow the instruction to put the HOSTS file in your C:WindowsSystem32Driversetc folder.
Now go to Start Menu, type Notepad but do not hit enter. Right click on Notepad and select Run As Administrator.

Go to File menu and click Open.
Copy and paste this into the File Name and click OK.
c:windowssystem32driversetcHOSTS

Now go to Edit menu and select Replace. Put 127.0.0.1 in Find box and put 255.255.255.0 in Replace box. Click Replace All.

Once done, you need to type back 127.0.0.1 for the first entry localhost.

Remember, localhost cannot be 255.255.255.0.
When you have done this correctly, it will look like this.

Save the file and exit Notepad.
Then go to Start menu and type: services.msc
From the service list, double click on “DNS Client”.

First click “Stop” to stop the service.
Then from the Startup Type dropdown, select Disabled.
Click OK.

Close all your browsers and reopen them. I highly recommend restarting your PC.
You are ready to browse faster, smarter, cheaper!
I also highly recommend everyone to use OpenDNS. You can save yourself from getting into malicious sites and being ripped off your bank balance, property, spouse and children. Just go to www.opendns.com and follow the instruction. It is the best thing happened on the internet after Wikipedia!
How does the HOSTS file trick work?
Here’s how internet works. You type www.something.com and it goes and finds out what is the IP address for this domain. First Windows checks a file called HOSTS. If it is not defined there, it will ask the DNS Server configured for your network to give it the IP for the domain so that it can connect to the webserver. If you put fake IP in HOSTS file, Windows will hand over fake IP to the browser and browser will connect to the fake IP. Thus by putting an invalid IP, we prevent browser or any application running on your PC from reaching the ads, tracker, malicious and porn websites.
Don’t forget to share this with your friends and families!
Prevent ASP.NET cookies from being sent on every css, js, image request
ASP.NET generates some large cookies if you are using ASP.NET membership provider. Especially if you are using the Anonymous provider, then a typical site will send the following cookies to every request when a user is logged in, whether the request is to a dynamic page or to any static resource:
.DBANON=w3kYczsH8Wvzs6MgryS4JYEF0N-8ZR6aLRSTU9KwVaGaydD6WwUHD7X9tN8vBgjgzKf3r3SJHusTYFjU85y
YfnunyCeuExcZs895JK9Fk1HS68ksGwm3QpxnRZvpDBAfJKEUKee2OTlND0gi43qwwtIPLeY1;
ASP.NET_SessionId=bmnbp155wilotk45gjhitoqg; DBAUTH12=2A848A8C200CB0E8E05C6EBA8059A0DBA228FC5F6EDD29401C249D2
37812344C15B3C5C57D6B776037FAA8F14017880E57BDC14A7963C58B0A0B30229
AF0123A6DF56601D814E75525E7DCA9AD4A0EF200832B39A1F35A5111092F0805B
0A8CD3D2FD5E3AB6176893D86AFBEB68F7EA42BE61E89537DEAA3279F3B576D0C
44BA00B9FA1D9DD3EE985F37B0A5A134ADC0EA9C548D
There are 517 bytes of worthless data being sent to every css, js and images from the browser to your webserver!
You might think 517 bytes is peanut. Do the math:
- Avg page has 40 requests to server. 40 x 517 bytes = 20 KB per page view.
- 1M page views = 20 GB
- That’s 20GB of data getting uploaded to your server for just 1M page views. It does not take millions of users to produce 1M page views. Around 100k+ users using your site every day can produce 1M page views every day.
Here’s how to prevent this:
- Setup a new website and map a different subdomain to it. If your main site is
www.yoursite.comthen mapstatic.yoursite.comto it. - Manually change all the
<link>, <script>, <img> css url(…)and prefix each resource withhttp://static.yoursite.com - If you don’t want to do it manually, use this solution I have done before.
- Add a
Global.asaxand in theEndRequestdo this trick:HttpContext context = HttpContext.Current; if (context.Request.Url.ToString.StartsWith("http://static.yoursite.com") { List<string> cookiesToClear = new List<string>(); foreach (string cookieName in context.Request.Cookies) { HttpCookie cookie = context.Request.Cookies[cookieName]; cookiesToClear.Add(cookie.Name); } foreach (string name in cookiesToClear) { HttpCookie cookie = new HttpCookie(name, string.Empty); cookie.Expires = DateTime.Today.AddYears(-1); context.Response.Cookies.Set(cookie); } }This code reads all the cookies it receives from request and expires them so that browser does not send those cookies again. If by any chance ASP.NET cookies get injected into the
static.yoursite.comdomain, this code will take care of removing them.
Tweaking WCF to build highly scalable async REST API
At 9 AM in the morning, during the peak traffic for your business, you get an emergency call that the website you built is no more. It’s not responding to any request. Some people can see some page after waiting for long time but most can’t. So, you think it must be some slow query or the database might need some tuning. You do the regular checks like looking at CPU and Disk on database server. You find nothing is wrong there. Then you suspect it must be webserver running slow. So, you check CPU and Disk on webservers. You find no problem there either. Both web servers and database servers have very low CPU and Disk usage. Then you suspect it must be the network. So, you try a large file copy from webserver to database server and vice versa. Nope, file copies perfectly fine, network has no problem. You also quickly check RAM usage on all servers but find RAM usage is perfectly fine. As the last resort, you run some diagnostics on Load Balancer, Firewall, and Switches but find everything to be in good shape. But your website is down. Looking at the performance counters on the webserver, you see a lot of requests getting queued, and there’s very high request execution time, and request wait time.

So, you do an IIS restart. Your websites comes back online for couple of minutes and then it goes down again. After doing restart several times you realize it’s not an infrastructure issue. You have some scalability issue in your code. All the good things you have read about scalability and thought that those were fairy tales and they will never happen to you is now happening right in front of you. You realize you should have made your services async.
However, just converting your sync services to async mode does not solve the scalability problem. WCF has a bug due to which it cannot serve requests as fast as you would like it to. The thread pool it uses to handle the async calls cannot start threads as requests come in. It only adds a new thread to the pool every 500ms. As a result, you get slow rampup of threads:

Read my article to learn details on how WCF works for async services and how to fix this bug to make your async services truly async and scale under heavy load.
http://www.codeproject.com/KB/webservices/fixwcf_for_restapi.aspx
Don’t forget to vote.