Solving common problems with Compiled Queries in Linq to Sql for high demand ASP.NET websites

If you are using Linq to SQL, instead of writing regular Linq
Queries, you should be using
Compiled Queries
. if you are building an ASP.NET web
application that’s going to get thousands of hits per hour,
the execution overhead of Linq queries is going to consume too much
CPU and make your site slow. There’s a runtime cost
associated with each and every Linq Query you write. The queries
are parsed and converted to a nice SQL Statement on *every* hit.
It’s not done at compile time because there’s no way to
figure out what you might be sending as the parameters in the
queries during runtime. So, if you have common Linq to Sql
statements like the following one throughout your growing web
application, you are soon going to have scalability nightmares:

var query = from widget in dc.Widgets
where widget.ID == id && widget.PageID == pageId
select widget;

var widget = query.SingleOrDefault();

There’s
a nice blog post by JD Conley
that shows how evil Linq to Sql
queries are:


image

You see how many times SqlVisitor.Visit is called to
convert a Linq Query to its SQL representation? The runtime cost to
convert a Linq query to its SQL Command representation is just way
too high.


Rico Mariani has a very informative performance comparison
of
regular Linq queries vs Compiled Linq queries performance:


image

Compiled Query wins on every case.

So, now you know about the benefits of compiled queries. If you
are building ASP.NET web application that is going to get high
traffic and you have a lot of Linq to Sql queries throughout your
project, you have to go for compiled queries. Compiled Queries are
built for this specific scenario.

In this article, I will show you some steps to convert regular
Linq to Sql queries to their Compiled representation and how to
avoid the dreaded exception “Compiled queries across
DataContexts with different LoadOptions not
supported.”

Here are some step by step instruction on converting a Linq to
Sql query to its compiled form:

First we need to find out all the external decision factors in a
query. It mostly means parameters in the WHERE clause. Say, we are
trying to get a user from aspnet_users table using
Username and Application ID:

Here, we have two external decision factor – one is the
Username and another is the Application ID. So, first think this
way, if you were to wrap this query in a function that will just
return this query as it is, what would you do? You would create a
function that takes the DataContext (dc named here),
then two parameters named userName and applicationID, right?

So, be it. We create one function that returns just this
query:


Converting a LInq Query to a function

Next step is to replace this function with a Func<> representation
that returns the query. This is the hard part. If you haven’t
dealt with Func<> and Lambda
expression before, then I suggest you read this
and
this
and then continue.

So, here’s the delegate representation of the above
function:


Creating a delegate out of Linq Query

Couple of things to note here. I have declared the delegate as
static readonly
because a compiled query is declared only once and reused by all
threads. If you don’t declare Compiled Queries as static,
then you don’t get the performance gain because compiling
queries everytime when needed is even worse than regular Linq
queries.

Then there’s the complex Func> thing. Basically the
generic Func<> is declared to
have three parameters from the GetQuery function and a return
type of IQueryable.
Here the parameter types are specified so that the delegate is
created strongly typed. Func<> allows up to 4
parameters and 1 return type.

Next comes the real business, compiling the query. Now that we
have the query in delegate form, we can pass this to CompiledQuery.Compile function
which compiles the delegate and returns a handle to us. Instead of
directly assigning the lambda expression to the func, we will pass
the expression through the CompiledQuery.Compile
function.


Converting a Linq Query to Compiled Query

Here’s where head starts to spin. This is so hard to read
and maintain. Bear with me. I just wrapped the lambda expression on
the right side inside the CompiledQuery.Compile function.
Basically that’s the only change. Also, when you call
CompiledQuery.Compile<>,
the generic types must match and be in exactly the same order as
the Func<>
declaration.

Fortunately, calling a compiled query is as simple as calling a
function:


Running Compiled Query

There you have it, a lot faster Linq Query execution. The hard
work of converting all your queries into Compiled Query pays off
when you see the performance difference.

Now, there are some challenges to Compiled Queries. Most common
one is, what do you do when you have more than 4 parameters to
supply to a Compiled Query? You can’t declare a Func<> with more than 4
types. Solution is to use a struct to encapsulate all the
parameters. Here’s an example:


Using struct in compiled query as parameter

Calling the query is quite simple:


Calling compiled query with struct parameter

Now to the dreaded challenge of using LoadOptions with Compiled
Query. You will notice that the following code results in an
exception:


Using DataLoadOptions with Compiled Query

The above DataLoadOption runs perfectly
when you use regular Linq Queries. But it does not work with
compiled queries. When you run this code and the query hits the
second time, it produces an exception:

Compiled queries across DataContexts with different
LoadOptions not supported

A compiled query remembers the DataLoadOption once its called.
It does not allow executing the same compiled query with a
different DataLoadOption again. Although
you are creating the same DataLoadOption with the same
LoadWith<>
calls, it still produces exception because it remembers the exact
instance that was used when the compiled query was called for the
first time. Since next call creates a new instance of DataLoadOptions, it does not
match and the exception is thrown. You can read details about the
problem in
this forum post
.

The solution is to use a static DataLoadOption. You cannot
create a local DataLoadOption instance and use
in compiled queries. It needs to be static. Here’s how you
can do it:


image

Basically the idea is to construct a static instance of DataLoadOptions using a static
function. As writing function for every single DataLoadOptions combination is
painful, I created a static delegate here and executed it right on
the declaration line. This is in interesting way to declare a
variable that requires more than one statement to prepare it.

Using this option is very simple:


image

Now you can use DataLoadOptions with compiled
queries.


kick it on DotNetKicks.com

Tips and tricks to rescue overdue projects

One of my friends, who runs his own offshore development shop,
was having nightmare situation with one of his customers. He’s way
overdue on a release, the customer is screaming everyday, he’s
paying his team from his own pocket, customer is sending an ever
increasing list of changes and so on. Here’s how we discussed some
ideas to get out of such a situation and make sure it does not
repeat in future:

Kabir: Hey, can you help me? My customer is making us
work for free for extra two months to fix bugs from our last
delivery. We did what he said. But after he saw the output, he came
up with hundred changes, which he somehow presents as bugs or
missing features and make them look like they are all our fault and
making us work for last two months for free. He is sending new
changes every week. We have no idea when we will complete the
iteration.

Omar: I see. Did you get a signed list of requirements
from customer before you started the development?

Kabir: Of course, I did. He sent us a word document
explaining what he wants and we sent him a task breakup with hour
estimates and total duration of three months. Now after three
months when we showed him the product, he said, it’s no where close
to what he had expected. Then he sent a gigantic list of things to
change.

Omar: All of those are bugs?

Kabir: Of course not. Most of them are new features.

Omar: Then why don’t you say those are new features? You have
the original word document to prove. Just ask him to show where in
the word document did he said X needs to be done?

Kabir: Well…, he’s tricky. He somehow makes things look
like it is obvious that X needs to be done and he’s not going to
accept a requirement as done until X is done. For example, he said
there must be a complete login form in the homepage. So, we did a
typical login form with user name, password and OK, Cancel button.
Now he says where’s the email verification thing? We said, you did
not ask for it. He said, “this is obvious, every login form has a
forgot password and email verification; I said *complete* login
form, not half-baked login form”. So, you see, we can’t really
argue to keep our image. Then, we did the login form exactly how he
said. Now he says, where the client side validations of proper
email address, username length, password confirmation? We said, you
never asked for it! He says, “come on, every single website
nowadays has AJAX enabled client side validation, do I have to tell
you every single thing? Aren’t you guys smart enough to figure this
out? You are already doing this for the third time, can’t you do it
really well this time?”

Omar: OK, stop. I see what’s your problem. Some customer
will always try to make you work more for less money. They will try
to squeeze out every bit of development they can for their bucks.
So, you have to be extra careful on how much you commit to them and
make sure they cannot chip in more requirements while development
is going on or when you deliver a version. Mockups are one good way
to make sure things are crystal clear between you and
customer. Did you not show him mockups of the features that
you will be building and make him sign those mockups?

Kabir: Yes, I made some mockups. But they were simple
mockups. I did not show the validations or all those side jobs like
sending verification emails.

Omar: Did you run those mockups through your engineers?
They could have told you about those details.

Kabir: No, I did not because developers don’t work on the
project until I get a signoff from client. So, I prepare all the
mockups myself to save cost.

Omar: So, this is the first problem. The mockups were as
ambiguous as the customer’s word document. Basically the mockups
just reflected the sentences in word document. Mockups did not
really show all possible navigations (ok, cancel, forgot, signup),
system messages, system actions behind the scene, workflows etc.
Are you getting what I am saying?

Kabir: Yes. Come on, I am not a developer. I can’t think
of every single details. That’s what developers do when they start
working on it.

Omar: But you provide estimates based on your mockups
right? So, if mockup shows there’s only a simple login form and
change password link, you charge 5 hours for it. But then when you
realize you have to send email for change password, email needs to
contain a tokenized URL, that URL needs to show a change password
form, where you need to validate using CAPTCHA etc, it becomes 20
hours of work. Right?

Kabir: Well yes. Generally I multiply all estimates by
1.5 just to be safe. But things have gone 3X to 10X off original
estimate.

Omar: Yes, I just gave you an example how a login form
estimate can go 4X off when the mockup is not run through an
engineer and the important issues are not addressed.

Kabir: So, you are saying I have to prepare all mockup
with an engineer?

Omar: In general, yes, since you aren’t good enough to
figure those out yourself; no offence. You will get good enough
after you build couple of products and get your a** kicked couple
of times, like mine. Mine got kicked about 17 times. After that it
became so hard that when I sit on it, I produce really good
mockups. After some more kicks, I hope to get 100% perfect in my
mockups.

Kabir: Ok, so the process is, I get word doc from
customer. I produce mockups from it. Then I run them through
engineers to add more details to them. Then after review with
customer, I run them through engineers again to estimate. Then I
ask customer to sign-off on the mockups and the estimate,
correct?

Omar: Well, first let me say, you don’t do a three month
long iteration since you are far away from your customer. You do
short two weeks sprints. Do you know SCRUM?

Kabir: Yes, one of our team does it.

Omar: I assume the team that got their a** kicked don’t
do it?

Kabir: right, they don’t.

Omar: OK, then first you start doing SCRUM. I won’t teach
you details. You can study about SCRUM online. Now, you collect
‘user stories’ from customer. If customer does not give you user
stories, just vague paras of requirements, you break the
requirements into small user stories. Understood?

Kabir: No, give example.

Omar: OK, say customer wants a *complete* login form. You
break it into couple of stories like:

  • User clicks on “login” link from homepage so that user can
    login to the system

    • User enters username (min 5, max 255 chars, only alphanumeric)
      in the username text field
    • User enters password (min 5, max 50 chars, only alphanumeric)
      in the password field
    • User clicks on “OK” button after entering username and
      password.
    • System validates username and password and shows the secure
      portal if credential is valid and user has permission to login and
      account is not locked.

Understood what user stories are?

Kabir: Yes, but you are missing all the validations that
we also overlooked and now we are working two months for free. This
“user stories” do not help at all.

Omar: Hold on, you just saw basic steps of a user story.
Now you describe each user story with the following:

  • All possible inputs of user and their valid format
  • All possible system generated messages for invalid input
  • All possible alternate navigation from the main user story. For
    example, while entering password, user can click on a help icon so
    that user can see what kind of passwords are allowed.

Got it?

Kabir: Now it’s starting to make sense. Then what? Show
these user stories to customers?

Omar: No, show them to your lead engineer who has enough
experience to identify if you missed something. Your Engr should
point out all the alternative system actions at least.

Kabir: What if my Engr can’t figure them out? What if
he’s just as dumb as me?

Omar: Fire him. Get a pay cut for yourself.

Kabir: Seriously, what do I do if that’s the case?

Omar: Your engineers will *always* come up with issues
with your mockups. You should always use another pair of eyes to
verify your mockups and add more details to it. You aren’t the only
smart guy in the world you know?

Kabir: I thought I was, ok. What’s next?

Omar: File those user stories in your issue tracking
system in some special category. Say “User Stories” category. What
do you use for your issue tracking system?

Kabir: Flyspray

Omar: Good enough. Create a new project in Filespray
named “User Stories”. File tasks for user stories. Each story, one
task. Attach the mockup to the tasks. Then create one account for
your customer so that customer can login and see the user stories,
make comments, suggest changes etc. You will get the conversation
with your customer recorded as comments in the task. This comes
handy for engineers and for resolving dispute later on. Moreover,
get your customer to prioritize the tasks properly. Understood?

Kabir: I don’t think customer will go through that
trouble. Customer will ask for some word document that has all the
user stories and she will write in the document what are the
changes. I will have to reflect them in Flyspray. Is it really
necessary to file user stories in Flysrpay? Can’t I just maintain
one word doc with customer?

Omar: Absolutely not. Word documents suffer from
versioning problem. You have one version, your customer has another
version, your engineers have another version. it becomes a
nightmare to move around with word docs which has many user stories
in it and keep them in sync all the time. Moreover, referencing a
particular use case also becomes a problem. Say at later stage of
the project, there’s a bug which needs to refer to User Story #123.
You will have to say User Story #123 in
centralserverfileshareuser stories1.doc. Now if
centralserver dies, or you put it somewhere else, all
these references are gone. Don’t go for word doc. Keep everything
on the web that you can refer to it using a URL or small number.
Another problem is numbering stories in Word Doc. Word won’t
produce unique ID for you. You will end up with duplicate user
story numbers. If you use Flyspray, it’s will generate unique ID
for you.

Kabir: OK, let me see how I convince my customer to use
Flyspray.

Omar: Yes, you should. If Flyspray is hard for customers,
use some simple issue tracking system that’s a no-brainer for
non-engineers. Some fancy AJAX based todolist site will be good
enough if it has picture attachment feature and auto task number
feature.

Kabir: OK, I will find such a website. So, I got the user
stories done. Now I show them to customer, review, make changes.
Finally I get customer to sign off on User story #X to #Y for a two
weeks sprint. Then what happens?

Omar: On your first day of sprint, you do a sprint
planning meeting where you present those user stories to your
engineers and ask them to break each story into small tasks and
estimate each task. Make sure no engineer put 1 day or 2 day for
any task. Break them into even smaller tasks like 4 hours of tasks.
This will force your engineers to give enough thought into the
stories and identify possible problems upfront. Generally when
someone says this is going to take a day or two, s/he has no idea
how to do it. S/he has not thought about the steps need to be done
to complete that task. Your are getting an estimate that’s either
overestimated or underestimated. Forcing an engineer to allocate
tasks in less than 4 hours slot makes an engineer think about the
steps carefully.

Kabir: If engineers do this level of estimate, they will
think about each task for at least an hour. This is going to take
days to finish estimating so many tasks. How do you do it in a
day?

Omar: We do 4 hours Planning meeting where Product Owner
explains the stories to engineers and then after 30 mins break,
another 4 hours meeting where engineers pickup stories and breaks
them into tasks and estimate on-the-fly. This 4 hours deadline is
strictly maintained. If Product team cannot explain the tasks for a
sprint in 4 hours, we don’t do the tasks in the sprint. If the
tasks are so complex or there are so many tasks that they cannot be
explained in 4 hours, engineers unlikely to do them within one/two
week long sprint. Similarly if engineers cannot estimate the tasks
in their 4 hours slot, the tasks are just too complex to estimate
and thus have high probability of not getting done in the sprint.
So, we drop them as well.

Kabir: This is impossible! No one’s going to attend 8
hours meeting on a day. Besides, telling them to estimate a task on
the spot is super inefficient. They won’t produce more than 60%
correct estimates. They will give some lump sum estimate and then
go away.

Omar: Incorrect, if engineers cannot make estimates of a
task in 10 to 20 minutes, they don’t have the capability of
estimating at all. If your engineers are habituated to take a task
from you for estimating and then go to their office, talk to their
friends on the phone, drink soda, walk around, gossip with
colleagues and end of the day if they have the mood to sit and
think about the estimate then open a new mail, write some numbers
and email it to you; they better learn to do this on-demand, when
requested, within time constraint. It’s a discipline that they need
to learn and implement in their life. Estimates are something they
do from the moment they wake up to the moment they go to sleep.
Besides, the planning meeting is the best place to estimate tasks –
all engineers are there, product team is there, your architects
should be there, QA team is there. It’s easy to ask questions, get
ideas and helps from others.

Kabir: I have engineers who just can’t do well under
pressure. They need some undisturbed moment, where they can sit and
think about tasks without anyone staring at them.

Omar: Train them to learn how to keep their head cool and
do their job in the midst of attention. Anyway, let’s stop talking
about these auxiliary issues and talk about the most important
issues. Where were we?

Kabir:About dropping tasks, I already negotiated with
customer that we are going to do story A, B, C in this sprint. Now
after the sprint planning meetings, engineers say they can’t do B.
Problem is I have already committed to deliver A, B, and C to
customer within 2 weeks and sent him the invoice. How do I handle
this?

Omar: How do you commit when you don’t know how long A,
B, and C are going to take?

Kabir: Customer tells me to do A, B, C within two weeks.
And after doing some preliminary discussion with engineers, I
commit to customer and then do the sprint planning meeting. I
can’t wait until the sprint meeting is done and developers
have given me estimates of all the tasks.

Omar: Wrong. You commit to customer after the sprint
planning meeting is done. Before that, you give customer just a
list of things that you believe you can try to do in following two
weeks. Tell customer that you will be able to confirm after the
sprint planning meeting. The time to do a sprint meeting is only 8
hours = a day. So, end of the day, you have some concrete stuff to
commit to customer. From your model where you give engineers days
to estimate, it won’t work. You have to finish planning
within a day and end of the day, commit to customer.

Kabir: What if customer does not agree? What if he says,
“I must get A, B and C in two weeks, otherwise I am going somewhere
else?”

Omar: This is a hard situation. I am tempted to say that
you tell your customer, “Go away!”, but in reality you can’t. You
have to negotiate and come to a mutual agreement. You cannot just
obey customer and say “Yes Mi Lord, we will do whatever you say”
because you clearly cannot do it. The fact is, end of the sprint,
you *will* get only A and C done and B not done. Then customer will
Fedex you his shoes so that you can ask someone to kick you with
it.

Kabir: Correct, so what do I do?

Omar: There are tricky solutions and non-tricky honest
solutions to this. Tricky solution is, say you engaged 5 engineers
in the project who can get A and C done in time. But you realize
you need another engineer to do B, otherwise there’s no way you can
finish A, B and C in two weeks. So, you invoice customer with 6
engineers and get A, B and C done. Now customer may not agree with
you paying for the 6th engineer. Then you do a clever trick. You
engage the 6th engineer free of cost in this sprint. Don’t tell
customer that there’s an extra head working in the project. Or you
can tell customer that out of good will, you want to engage another
engineer free of cost to make sure customer gets a timely delivery.
This boosts your image. Later on, when you get a sprint that’s more
or less relaxed and 4 engineers can do the job, you secretly engage
one engineer to some other project but still charge for 5 engineers
to your customer. This way you cover the cost for the 6th
engineer that you secretly engaged earlier sprint. This is dirty.
But when you have so hard a** customer who’s forcing you “what”,
“when” and “how” all at the same time and not open to negotiation,
you have no choice but to do these dirty tricks. You can also add
extra one hour to every task for every engineer in a sprint or add
some vague tasks like “Refactor User object to allow robust login”.
This way you will get quite some amount of extra hours that will
compensate for the hidden free engineer that you engage. You get
the idea right?

Kabir: Ingenious! And what’s the honest and clear way to
do these?

Omar: You negotiate with customer. You tell your customer
that he or she can only have any two choices from Money-Scope-Time.
This is called the project management triangle. Do you know about
this?

Kabir: Googling…

Omar: Read this article:

http://office.microsoft.com/en-us/project/HA010211801033.aspx

It shows a triangle like this:


clip_image002

So, your customer can specify any two. If customer specifies
Scope and Time (“what” and “when”), then customer must be flexible
on Money or “how” you do it within those two constraints. If
customer specifies Money and Scope, then you are free to decide on
time. You engage lower resource and take more time to get things
done. Got the idea?

Kabir: Yes, understood. Nice, I can show this to customer
and educate him. Is there any book for the evil tricks that you
just gave me?

Omar: No, I might write one soon. I will name it
“Customers are evil, so be you”.

Raisul: Hey, I have fixed people engaged in a project. I can’t
change the number of people sprint-to-sprint to compensate for
change in money. So, the triangle does not work for me. What do I
do here?

Omar: Right. I also made a slightly different version of
it. Here’s my take:


image

This is for situation where you have fixed resource engaged for
a particular customer. In that case, you cannot reduce people
on-demand because you cannot reassign them. Such a case requires
different strategy. If customer forces you Quality and Time,
customer must be willing to sacrifice Quantity. Customer cannot
say, produce perfect login form in 2 weeks and add cool ajax
effects to it. Customer has to sacrifice cool ajax effects, or
sacrifice *perfection* of login form, or sacrifice number of
days.

From the above two triangles, which one’s more appropriate for
you?

Kabir: Second one because customer hires 5 engineers from
me. I cannot take one away and engage in a different project. Well,
not openly of course.

Omar: OK, sounds fair. What else do you need from me?

Kabir: Let me think about all these. This is definitely
worth thinking. I have to figure out whether to play fair or play
clever. End of the day, I need to produce great product, so that, I
get good recommendation and future projects from customer. So, I
need to do whatever it takes. It’s hard to run an offshore dev shop
where we kinda have to work like slaves and like a bunch of zombies
mumble every 10 mins – “Customer is always right”. You are very
lucky to have your own company.

Omar: I had two offshore dev shops before Pageflakes. I know how it feels.
Wish you good luck. I have seen your product, you guys are building
a great ASP.NET MVC+jQuery application. Release it. It’s worth
showcasing.

Raisul: Thank you very much. See ya…

(End of chat)

This is the diagram my friend produced, which shows the steps to
do before a sprint is started:
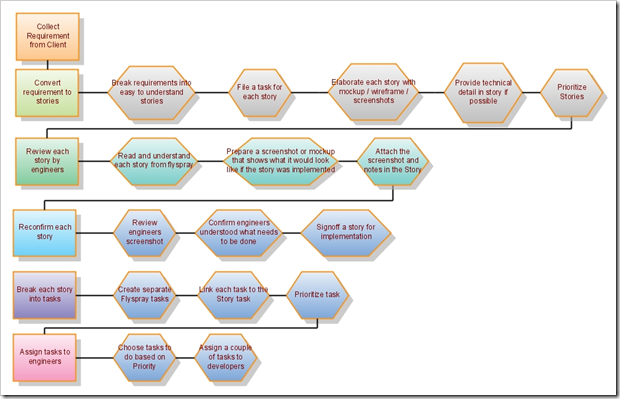
Workflow for Product Manager

Handy for Product Managers. Enlightening for developers.

kick it on DotNetKicks.com

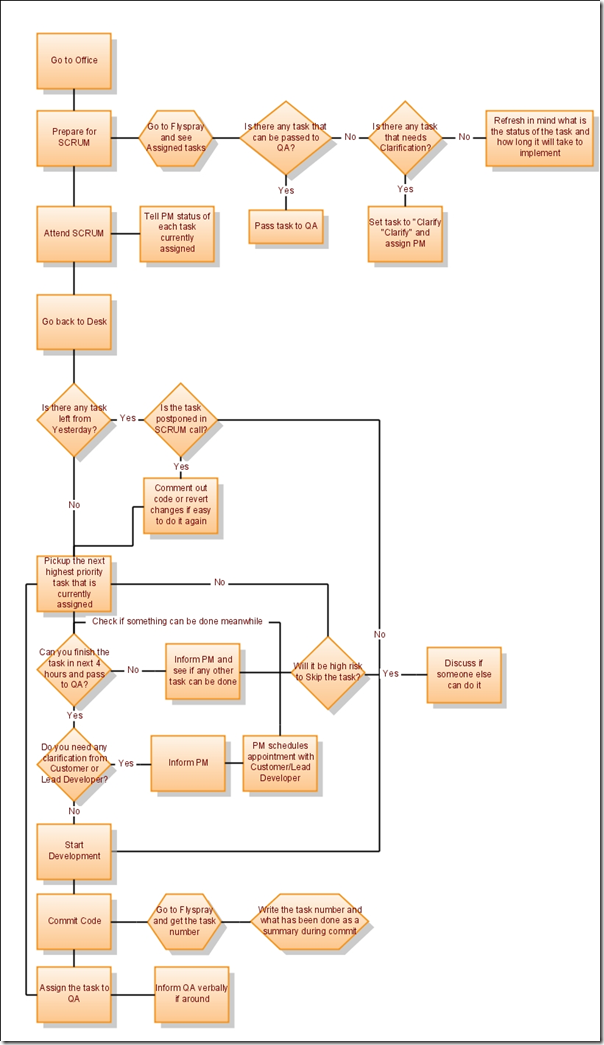
An Agile Developer’s workflow when SCRUM is used

If you are planning to start SCRUM at your company, you might
need to train developers and QA to get into the mindset of an Agile
developer. SCRUM is only successful when the developers and QA get
into the habit of following the principles of SCRUM by heart. So,
sometimes you need to offer training or do trial sprints to give
some room to your developers how to get used to the working fashion
of SCRUM. Giving them a handy workflow diagram that shows how they
should work helps soothe the steep learning curve required for
non-super star developers. I made such a workflow while I was
teaching SCRUM at my friend’s company. The following diagram was
printed and hung over the desk of each and every developer to help
them grasp the culture of SCRUM quickly:


image

We use Flyspray for issue tracking, so you will see the mention
of it frequently.

You will see the step to “Update Sprint backlog with remaining
hours” is missing. This is done kinda verbally and scrum master
(sometimes same person who is the product owner) keeps track of
it.

Hope you find this useful.


kick it on DotNetKicks.com

ASP.NET website Continuous Integration+Deployment using CruiseControl.NET, Subversion, MSBuild and Robocopy

You can setup continuous integration and automated deployment
for your web application using CruiseControl.NET, Subversion,
MSBuild and Robocopy. I will show you how you can automatically
build the entire solution, email build report to developers and QA,
deploy latest code in IIS all using CruiseControl.NET every N
minutes.

First get the following:

  • CruiseControl.NET

  • Subversion
    (install the command line tools and add the
    Subversion bin path to PATH environment variable)
  • Robocopy (Windows Vista/2008 has it built-in, here’s the link
    for
    Windows 2003
    )
  • Install .NET Framework. You need it for MSBuild.

You will learn how I have configured Continuous Integration and
Deployment for my open source AJAX Portal project www.Dropthings.com. The code is
hosted at CodePlex. When some developer makes a commit,
CruiseControl downloads the latest code, builds the entire
solution, emails build report and then deploys the latest web site
to IIS 6.0.

After installing CruiseControl.NET, go to Programs -> Cruise Control ->
CruiseControl.NET Config
.

Now keep copying and pasting the following XML blocks and make
sure you understand each block and make necessary changes:


   1: <cruisecontrol>

   2:     <project name="Dropthings" queue="DropthingsQueue" queuePriority="1">

   3:         

   7:         <workingDirectory>d:ccdropthingscodetrunkworkingDirectory>

   8:         

   9:         <artifactDirectory>d:ccdropthingsartifactartifactDirectory>

  10:         <category>Dropthingscategory>

  11:         

  12:         <webURL>http://localhost/ccnet/webURL>

  13:         <modificationDelaySeconds>60modificationDelaySeconds>

  14:         <labeller type="defaultlabeller">

  15:             <prefix>0.1.prefix>

  16:             <incrementOnFailure>trueincrementOnFailure>

  17:             <labelFormat>000labelFormat>

  18:         labeller>

  19:         <state type="state" directory="State" />

First change the working directory. It needs to be the path of
the folder where you will have the solution downloaded. I generally
create folder structure like this:

  • D:CC – Root for all CC.NET enabled projects
    • ProjectName – Root project folder
      • Code – Code folder where code is downloaded from
        subversion
      • Artifact – CC.NET generates a lot of stuff. All goes
        here.

Next comes the Subversion integration block:


   1: <sourcecontrol type="svn">

   2:     

   3:     <trunkUrl>http://localhost:8081/tfs02.codeplex.com/dropthings/trunktrunkUrl>

   4:     <workingDirectory>workingDirectory>

   5:     <username>***** SUBVERSION USER NAME *****username>

   6:     <password>***** SUBVERSION PATH *****password>

   7: sourcecontrol>

Here specify the subversion location where you want to download
code to the working folder. You should download the entire solution
because you will be building the entire solution using MSBuild
soon.

I left empty.
This means whatever is specified earlier in the is
used. Otherwise you can put some relative folder path here or any
absolute folder.

Now we start building the tasks that CC.NET executes – Build,
Email, and Deploy.


   1: <tasks>

   2:     <artifactcleanup   cleanUpMethod="KeepLastXBuilds"   cleanUpValue="5" />

   3:     <modificationWriter>

   4:         <filename>mods.xmlfilename>

   5:         <path>path>

   6:     modificationWriter>

   7:

   8:     

   9:     <msbuild>

  10:         <executable>C:windowsMicrosoft.NETFramework64v3.5MSBuild.exeexecutable>

  11:         <workingDirectory>workingDirectory>

  12:         <projectFile>Dropthings.msbuildprojectFile>

  13:         <targets>Buildtargets>

  14:         <timeout>300timeout>

  15:         <logger>C:Program Files (x86)CruiseControl.NETserverThoughtWorks.CruiseControl.MsBuild.dlllogger>

  16:     msbuild>

This block first says, keep artifacts for last 5 build and
remove olders. Artifacts are like build reports, logs etc. You can
increase the value for longer history.

Then the most important task. The
executable path is to the MSBuild.exe. I am using .NET 3.5
Framework 64bit edition. You might have .NET 2.0 and 32bit version.
So, set the right path here for the MSbuild.exe.

maps to a
MSBuild file. It’s a skeleton MSBuild file which basically says
build this Visual Studio solution file. Here’s how the msbuild file
looks like:


<Project DefaultTargets="Build" xmlns="http://schemas.microsoft.com/developer/msbuild/2003">

  <Target Name="Build">


    <MSBuild Projects="Dropthings.sln" Targets="Rebuild" />

  Target>

Project>

The Dropthings.msbuild and
Dropthings.sln file
exists in the same trunk folder. This file says – build
Dropthings.sln and do a rebuild.

Now you got the build done. Next is to deploy it. You will be
using robocopy to copy files from the code folder to a destination
folder which is mapped in IIS to a website. Robocopy will do a
synchronization of the directories. It will add new files,
overwrite old files and removes files from destination folder which
no longer exists in the source folder.

Before you can deploy, you need to stop the website or restart
IIS. Otherwise some files may be in use and you will not be able to
delete or overwrite the files. Here’s how to stop IIS using the
iisreset command
line tool:


<exec>

    <executable>iisresetexecutable>

    <buildArgs>/stopbuildArgs>

exec>

If you do not want to stop the entire IIS, instead just stop a
website and recycle an application pool, you can use the iisweb.vbs
script for stopping a website and iisapp.vbs script for recycling
application pool. Here’s an example:


<exec>

    <executable>iiswebexecutable>

    <buildArgs>/stop "Dropthings"buildArgs>

exec>


<exec>

    <executable>iisappexecutable>

    <buildArgs> /a "Dropthings" /rbuildArgs>

exec>

You need to first register cscript as the default script
runtime. In order to do this, go to command line and enter iisweb.
It will tell you that it cannot use wscript to run this script and
it needs to make cscript default. Let it make cscript as
default.

Now the time to do the deployment of latest web site files. The
following task launches robocopy to do the deployment:


<exec>


    <executable>robocopy.exeexecutable>

    <baseDirectory>DropthingsbaseDirectory>

    <buildArgs>. d:ccDropthingsDeploy *.* /E /XA:H /PURGE /XO /XD ".svn" /NDL /NC /NS /NPbuildArgs>

    <buildTimeoutSeconds>60buildTimeoutSeconds>

    <successExitCodes>1,0successExitCodes>

exec>

First you need to correct the robocopy.exe path. For Windows
Vista/Windows 2008, keep it as it is. For Windows 2003, you need to
specify the full path. You also need to remove the (x86) from the
path if you have 32bit OS.

Next is the . This is
relative to the working directory. It’s the path of the website
folder. Dropthings website folder is located under the Dropthings
folder under trunk. So, I have specified Dropthings as the
subfolder where the website files are located. You need to specify
your project’s website folder’s relative path here form the
.

Next change the path in the node. First
one is the source “.” which you keep as it is. It means copy files
from the baseDirectory. Next is the
absolute path to the deployment folder where the web site is mapped
in IIS. You can use both relative or absolute path here. While
using relative path, just keep in mind the robocopy is running from
the folder.

After the path keep the *.* and the remaining flags intact. The
flags mean:

  • Copy all subdirectories /E
  • Copy hidded files /XA:H
  • Do not copy old files /XO
  • Exclude .svn directory while copying files /XD “.svn”
  • Do not show list of files and directories being copie /NDL,
    /NC, /NP

After the deployment, you need to turn IIS back on or start the
website that you stopped:


<exec>

    <executable>iisresetexecutable>

    <buildArgs>/startbuildArgs>

exec>


Now we got the build and deployment done. Next is to email a
nice report to developers and QA. If build succeeds, email both
developers and QA so that they can check out the latest build. But
if build fails, email only developers.

<publishers>

    <rss/>

    <xmllogger />

    <statistics />


    <email from="admin@yourcompany.com" mailhost="localhost" mailport="25" includeDetails="TRUE"

           mailhostUsername="" mailhostPassword="" useSSL="FALSE">


        <users>

            <user name="Developer1" group="devs" address="dev1@yourcompany.com"/>

            <user name="Developer2" group="devs" address="dev2@yourcompany.com"/>

            <user name="Developer3" group="devs" address="dev3@yourcompany.com"/>


            <user name="QA1" group="qa" address="qa1@yourcompany.com"/>

            <user name="QA2" group="qa" address="qa2@yourcompany.com"/>

            <user name="QA3" group="qa" address="qa3@yourcompany.com"/>


        users>


        <groups>

            <group name="devs" notification="Always"/>

            <group name="qa" notification="Success"/>

        groups>


        <converters>


        converters>


        <modifierNotificationTypes>

            <NotificationType>AlwaysNotificationType>

        modifierNotificationTypes>


    email>

    <modificationHistory  onlyLogWhenChangesFound="true" />

publishers>

First you need to change the tab where you
specify the from address, mail server name, and optionally a user
account for the email address that you need to use to send out
emails.

Then edit the node and put your
developers and QA.

That’s it! You got the configuration file done. Next step is to
launch the CruiseControl.NET from Programs -> CruiseControl.NET
-> CruiseControl.NET. It will launch a process that will execute
the tasks according to the configuration. On Windows Vista, you
will have to run it with Administrative privilege.

There’s also a Windows Service that gets installed. It’s named
CruiseControl.NET. You can start the service as well on a server
and go to sleep. It will do continuous integration and automated
deployment for you.

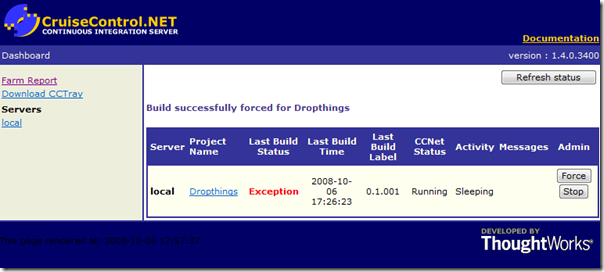
There’s also a web based Dashboard that you can use to force a
build or stop a build or see detail build reports.


image

You can create multiple projects. You can have one project to
build trunk code only, but do no deployment. Then you can create
another project to build, deploy some branch that’s ready for
production. You can create another project to build and deploy on
QA server and so on.


Here’s the full configuration file
that you can use as your
baseline.


kick it on DotNetKicks.com

Using multiple broadband connections without using any special router or software

I have two broadband connections. One cheap connection, which I
mostly use for browsing and downloading. Another very expensive
connection that I use for voice chat, remote desktop connection
etc. Now, using these two connections at the same time required two
computers before. But I figured out a way to use both connections
at the same time using the same computer. Here’s how:

Connect the cheap internet connection that is used mostly for
non-critical purpose like downloading, browsing to a wireless
router.

Connect the expensive connection that is used for network
latency sensitive work like Voice Conference, Remote Desktop
directly via LAN.

When you want to establish a critical connection like starting
voice conf app (Skype) or remote desktop client, momentarily
disconnect the wireless. This will make your LAN connection the
only available internet. So, all the new connections will be
established over the LAN. Now you can start Skype and initiate a
voice conference or use Remote Desktop client and connect to a
computer. The connection will be established over LAN.

Now turn on wireless. Wireless will now become the first
preference for Windows to go to internet. So, now you can start
Outlook, browser etc and they will be using the wireless internet
connection. During this time, Skype and Terminal Client is still
connected over the LAN connection. As they use persisted
connection, they keep using the LAN connection and do not switch to
the wireless.

This way you get to use two broadband connections
simultaneously.


image

Here you see I have data transfer going on through two different
connection. The bottom one is the LAN which is maintaining a
continuous voice data stream. The upper one is the wireless
connection that sometimes consumes bandwidth when I browse.


image

Using Sysinternal’s TCPView, I can see some connection is going
through LAN and some through Belkin router. The selected ones – the
terminal client and the MSN Messenger is using LAN where the
Internet Explorer and Outlook is working over Wireless
connection.

Best practices for creating websites in IIS 6.0

Every time I create an IIS website, I do some steps, which I
consider as best practice for creating any IIS website for better
performance, maintainability, and scalability. Here’ re the things
I do:

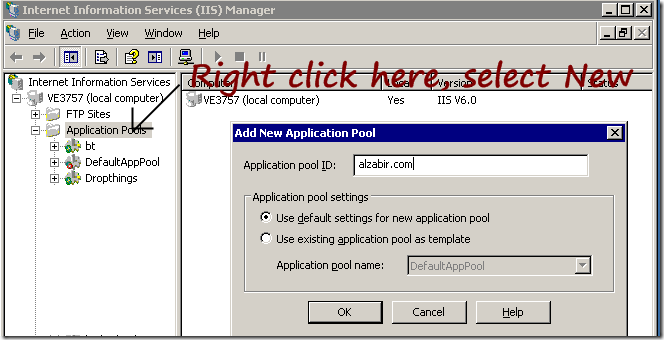
Create a separate application pool for each web
application

I always create separate app pool for each web app because I can
select different schedule for app pool recycle. Some heavy traffic
websites have long recycle schedule where low traffic websites have
short recycle schedule to save memory. Moreover, I can choose
different number of processes served by the app pool. Applications
that are made for web garden mode can benefit from multiple process
where applications that use in-process session, in memory cache
needs to have single process serving the app pool. Hosting all my
application under the DefaultAppPool does not give me the
flexibility to control these per site.

The more app pool you create, the more ASP.NET threads you make
available to your application. Each w3wp.exe has it’s own
thread pool. So, if some application is congesting particular
w3wp.exe process, other applications can run happily on
their separate w3wp.exe instance, running under separate app
pool. Each app pool hosts its own w3wp.exe instance.

So, my rule of thumb: Always create new app pool for new web
applications and name the app pool based on the site’s domain name
or some internal name that makes sense. For example, if you are
creating a new website alzabir.com, name the app pool alzabir.com
to easily identify it.

Another best practice: Disable the DefaultAppPool so that
you don’t mistakenly keep adding sites to
DefaultAppPool.


image

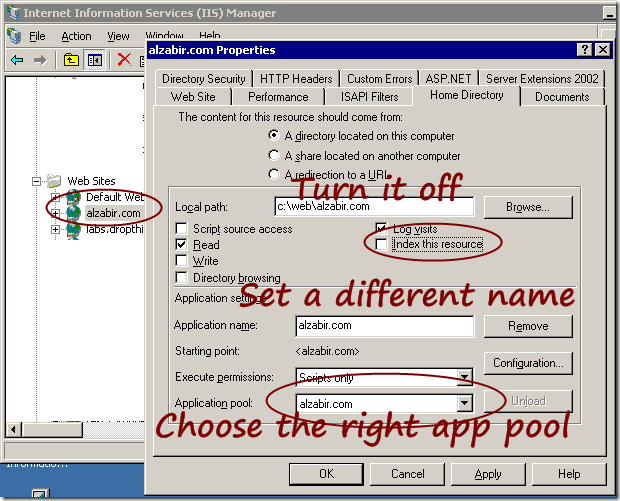
First you create a new application pool. Then you create a new
Website or Virtual Directory, go to Properties -> Home Directory
tab -> Select the new app pool.


image

Customize Website properties for performance,
scalability and maintainability

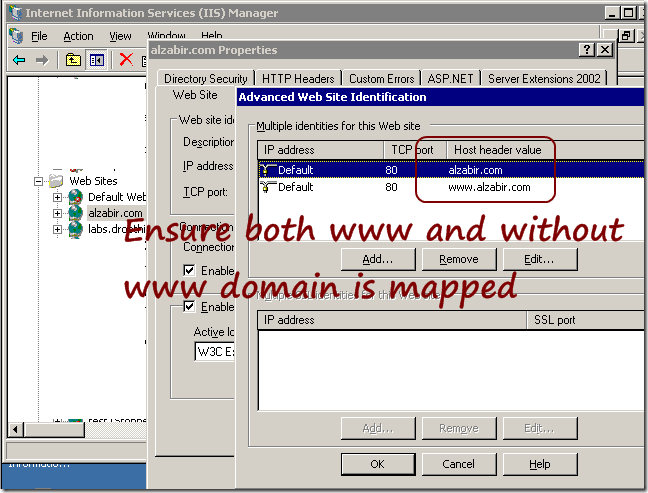
First you map the right host headers to your website. In order
to do this, go to WebSite tab and click on “Advanced” button. Add
mapping for both domain.com and www.domain.com. Most of the time,
people forget to map the domain.com. Thus many visitors skip typing
the www prefix and get no page served.


image

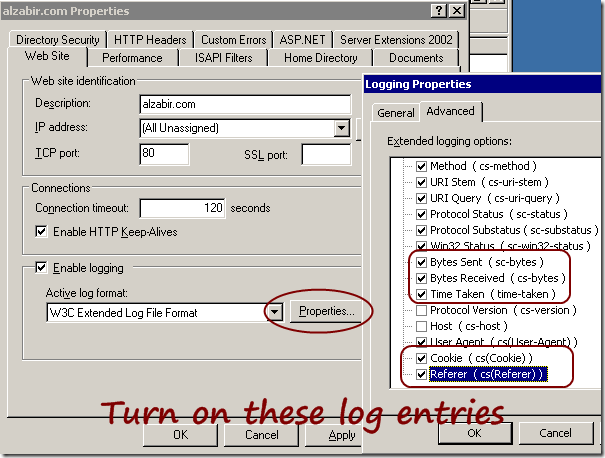
Next turn on some log entries:


image

These are very handy for analysis. If you want to measure your
bandwidth consumption for specific sites, you need the Bytes Sent.
If you want to measure the execution time of different pages and
find out the slow running pages, you need Time Taken. If you want
to measure unique and returning visitors, you need the Cookie. If
you need to know who is sending you most traffic – search engines
or some websites, you need the Referer. Once these entries are
turned on, you can use variety of Log Analysis tools to do the
analysis. For example, open source AWStats.

But if you are using Google Analytics or something else, you
should have these turned off, especially the Cookie and Referer
because they take quite some space on the log. If you are using
ASP.NET Forms Authentication, the gigantic cookie coming with every
request will produce gigabytes of logs per week if you have a
medium traffic website.


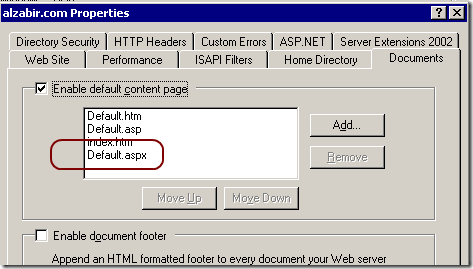
image

This is kinda no brainer. I add Default.aspx as the default
content page so that, when visitors hit the site without any .aspx
page name, e.g. alzabir.com, they get the default.aspx served.


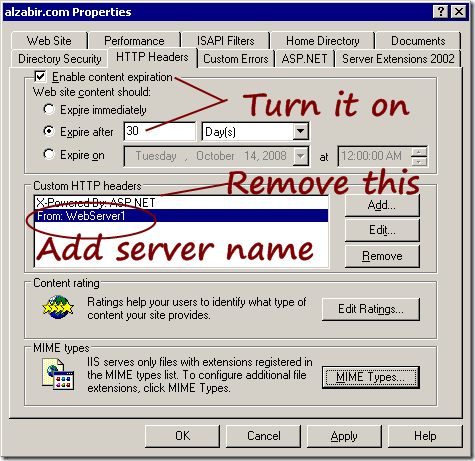
image

Things I do here:

  • Turn on Content Expiration. This makes static files remain in
    browser cache for 30 days and browser serves the files from its own
    cache instead of hitting the server. As a result, when your users
    revisit, they don’t download all the static files like images,
    javascripts, css files again and again. This one setting
    significantly improves your site’s performance.
  • Remove the X-Powered-By: ASP.NET header. You really
    don’t need it unless you want to attach Visual Studio Remote
    Debugger to your IIS. Otherwise, it’s just sending 21 bytes on
    every response.
  • Add “From” header and set the server name. I do this on each
    webserver and specify different names on each box. It’s handy to
    see from which servers requests are being served. When you are
    trying to troubleshoot load balancing issues, it comes handy to see
    if a particular server is sending requests.


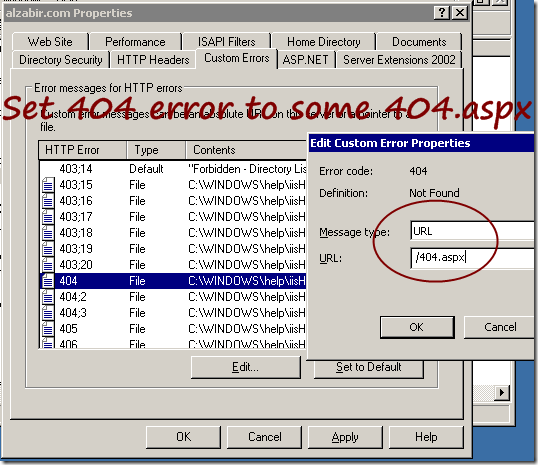
image

I set the 404 handler to some ASPX so that I can show some
custom error message. There’s a 404.aspx which shows some nice
friendly message and suggests some other pages that user can visit.
However, another reason to use this custom mapping is to serve
extensionless URL from IIS.
Read this blog post for details
.


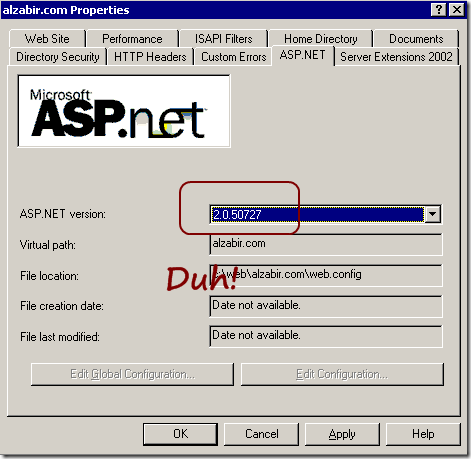
image

Make sure to set ASP.NET 2.0 for your ASP.NET 2.0, 3.0 and 3.5
websites.

Finally, you must, I repeat you “MUST”
turn on IIS 6.0 gzip compression
. This turns on the Volkswagen
V8 engine that is built into IIS to make your site screaming
fast.

kick it on DotNetKicks.com

Create ASP.NET MVC Controllers under Namespace and specific URL

When you have a lot of controllers, you need to organize them
under Namespaces. Also, it is better to put controllers under
subfolders in order to organize them properly and have some
meaningful URL for them like /Admin/User where Admin
is the subfolder and User is the controller. For example,
you might have a lot of controllers that are APIs exposed by your
web app, not regular pages. So, you might want to put them under
/API/ folder. You also want to make sure no one can access
those controllers from the root url. For example, no one must call
/User/GetUserList instead they must call
/API/User/GetUserList

ASP.NET MVC default routing and Controller Factory is very
greedy, it ignores the subfolders inside the “Controllers” folder.
There’s a DefaultControllerFactory class in ASP.NET MVC
which traverses all controllers under the “Controller” folder and
creates a cache using just the class name as the key. So, it
ignores any namespace or any subfolder where you have put the
controller. So, I created a derivative of the default controller
factory and created a new factory that checks if the requested
controller belongs to any specific namespace and whether that
controller must be inside a specific subfolder. You can map
/Admin folder to respond to all controllers that are under
then YourWebApp.Admin namespace. Similarly, you can map
/API folder to respond to all controllers that are under the
YourWebApp.API namespace. None of these controllers can be
accessed outside the specified URL. Here’s the factory that does
it:


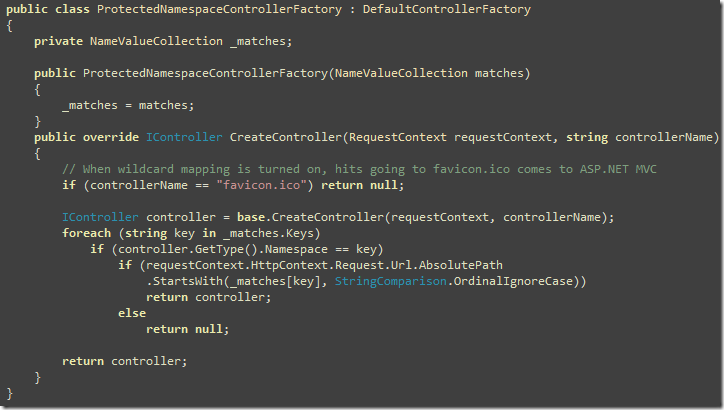
ProtectedNamespaceController Factory that replaces DefaultControllerFactory

This controller checks the namespace of the controller being
returned by ASP.NET MVC’s default implementation and ensures the
requested URL is the right url where controllers from the namespace
can be accessed. So, this means if the controller matches
MvcWebAPI.API.UserController, it ensures the URL being
requested must be /MvcWebAPI/API/User. It will return null
if the URL was something else like /MvcWebAPI/User or
/MvcWebAPI/SomeotherFolder/User.

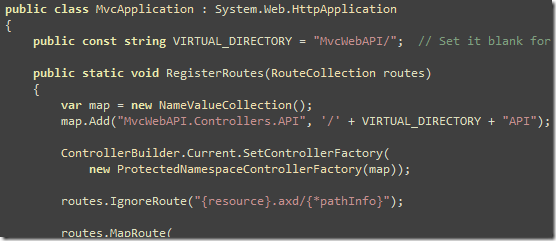
Here’s how you use it form Global.asax:


Using ProtectedNamespaceControllerFactory from Global.asax

You create a mapping for a Namespace and the subfolder it must
belong to. Then you register the new Controller Factory as the
default controller factory.

Now the second catch is, the default Route for the
{controller}/{action}/{id} won’t work for you. You need to
create a specific router that starts with the subfolder name. For
example, API/{controller}/{action}


Creating a new route for the Controllers under the /API folder

Here’ two things to notice:

  • The use of PathStartWith routing constraint, which I
    will explain soon
  • The last parameter which tells the route to include the API
    namespace for this route. Otherwise it can’t find the controllers
    in the API namespace

So, the PathStartsWith routing constraint ensures this
route gets hit only when the requested URL is under the
/API/ folder. For any other URL, it returns false and thus
the routing handler skips this route.


image

It just does a comparison on the AbsolutePath of the
current request URL to ensure the URL starts with the specified
match.

Similarly, we need to tell the Default route to ignore all paths
with /API. Here’s how to do it:


image

That’s it. Enjoy the full code from:

http://code.msdn.microsoft.com/MvcWebAPI

Read my previous post on creating Web API using ASP.NET MVC that
can consume and expose Json and Xml:


Create REST API using ASP.NET MVC that speaks both Json and plain
Xml

Note: incase you already read it, I have published new code that
you should download.

kick it on DotNetKicks.com

Create REST API using ASP.NET MVC that speaks both Json and plain Xml

UPDATE: There’s a newer article on this that shows how to create a truly RESTful API and website using the same ASP.NET MVC code.

www.codeproject.com/KB/aspnet/aspnet_mvc_restapi.aspx

ASP.NET MVC Controllers can directly return objects and collections, without rendering a view, which makes it quite appealing for creating REST like API. The nice extensionless Url provided by MVC makes it handy to build REST services, which means you can create APIs with smart Url like “something.com/API/User/GetUserList”

There are some challenges to solve in order to expose REST API:

  • Based on who is calling your API, you need to be able to speak both Json and plain old Xml (POX). If the call comes from an AJAX front-end, you need to return objects serialized as Json. If it’s coming from some other client, say a PHP website, you need to return plain Xml.
  • Similarly you need to be able to understand REST, Json and plain Xml calls. Someone can hit you using REST url, someone can post a Json payload or someone can post Xml payload.

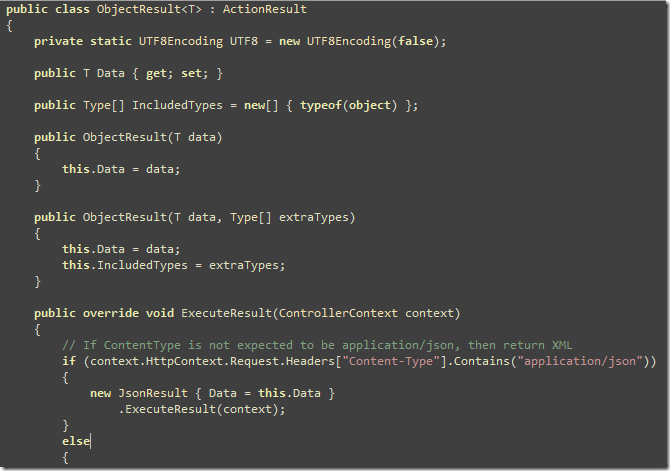
I have created an ObjectResult class which takes an object and generates Xml or Json output automatically looking at the Content-Type header of HttpRequest. AJAX calls send Content-Type=application/json. So, it generates Json as response in that case, but when Content-Type is something else, it does simple Xml Serialzation.

image

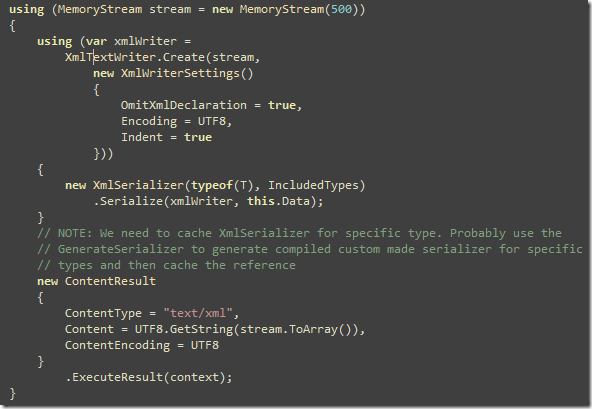
Here’s the ObjectResult that you can use from Controllers to return objects and it takes care of proper serialization method. Above shows the Json serialization, which is quite simple.XmlSerialization is a bit complex though:

image

Things to note here:

  • You have to force UTF8 encoding. Otherwise it produces UTF16 output.
  • XML Declaration is skipped because that’s not quite necessary. Wastes bandwidth. If you need it, turn it on.
  • I have turned on indenting for better readability. You can turn it off to save bandwidth.

Some of you might be boiling inside looking at my obscure coding style. I love this style! I am spoiled by jQuery. I wish there was a cQuery. I actually started writing one, but it never saw day light just like my hundred other open source attempts.

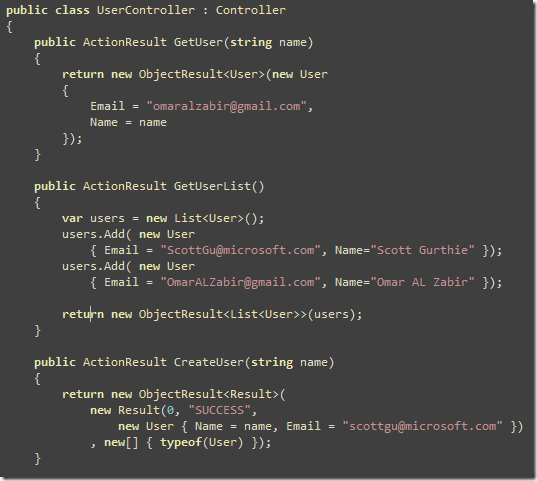
Now back to Object Serialization, we got the serialization done. Now you can return objects from Controller easily:

image

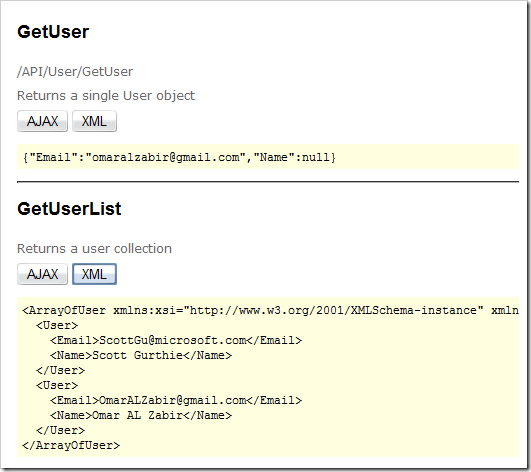
You can use the test web project to call these methods and see the result:

image

So far you have seen simple object and list serialization. A best practice is to return a common result object that has some status, message and then the real payload. It’s handy when you only need to return some error but no object or list. I use a common Result object that has three properties – ErrorCode (0 by default means success), Message (a string data type) andData which is the real object.

image

When you want to return only a result with error message, you can do this:

image

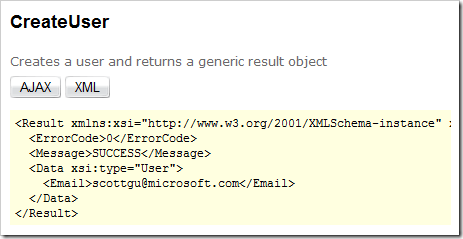
This produces a result like this:

image

No payload here. So, the return format is always consistent. Those who are consuming service can write a common Xml or Json parsing code to consume both success and failure response. Those who are building API for their website, I humbly request you to return consistent response for both success and failure. It makes our life so easier.

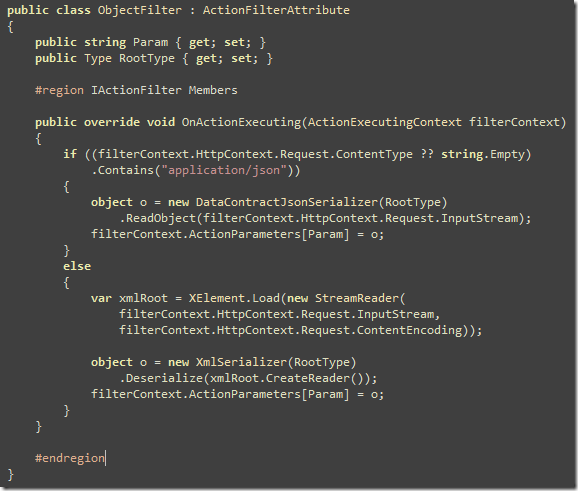
So, far we have only returned objects and lists. Now we need to accept Json and Xml payload, delivered via HTTP POST. Sometimes your client might want to upload a collection of objects in one shot for batch processing. So, they can upload objects using either Json or Xml format. There’s no native support in ASP.NET MVC to automatically parse posted Json or Xml and automatically map to Action parameters. So, I wrote a filter that does it.

image

This filter intercepts calls going to Action methods and checks whether client has posted Xml or Json. Based on what has been posted, it uses DataContractJsonSerializer or simpleXmlSerializer to convert the payload to objects or collections.

You use this attribute on Action methods like this:

image

The attribute expects a parameter name where it stores the deserialized object/collection. It also expects a root type that it needs to pass to the deserializer. If you are expecting a single object, specify typeof(SingeObject). If you are expecting a list of objects, specify an array of that object like typeof(SingleObject[])

You can test the project live at this URL:

http://labs.dropthings.com/MvcWebAPI

The code is also available at:

http://code.msdn.microsoft.com/MvcWebAPI

Enjoy!

————

Here’s an Eid gift for my believer brothers. Check out this amazing sitewww.quranexplorer.com/. You will get online recitation, translation – verse by verse. The recitation of Mishari Rashid is something you have to listen to to believe. Try these two recitations to see what I mean:

Sura 97 – Verse 1
Sura 114 – Verse 1

Press the “Play” icon at bottom left (hard to find).

kick it on DotNetKicks.com

HTTP handler to combine multiple files, cache and deliver compressed output for faster page load

It’s a good practice to use many small Javascript and CSS files
instead of one large Javascript/CSS file for better code
maintainability, but bad in terms of website performance. Although
you should write your Javascript code in small files and break
large CSS files into small chunks but when browser requests those
javascript and css files, it makes one Http request per file. Every
Http Request results in a network roundtrip form your browser to
the server and the delay in reaching the server and coming back to
the browser is called latency. So, if you have four javascripts and
three css files loaded by a page, you are wasting time in seven
network roundtrips. Within USA, latency is average 70ms. So, you
waste 7×70 = 490ms, about half a second of delay. Outside USA,
average latency is around 200ms. So, that means 1400ms of waiting.
Browser cannot show the page properly until Css and Javascripts are
fully loaded. So, the more latency you have, the slower page
loads.

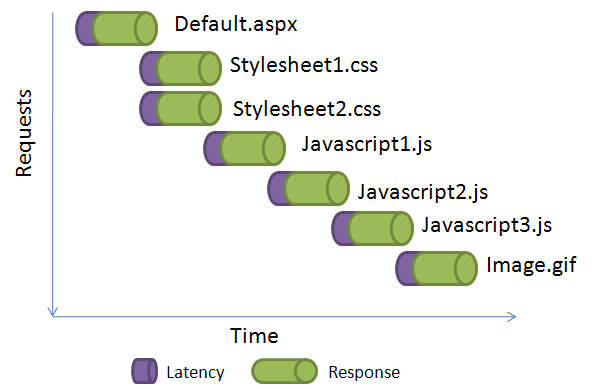
Here’s a graph that shows how each request latency adds up and
introduces significant delay in page loading:

You can reduce the wait time by using a CDN. my previous blog post about using CDN. However, a better

solution is to deliver multiple files over one request using an
HttpHandler that combines several files and delivers as one
output. So, instead of putting many < script> or tag, you just put one < script> and one tag, and
point them to the HttpHandler. You tell the handler which
files to combine and it delivers those files in one response. This
saves browser from making many requests and eliminates the
latency.

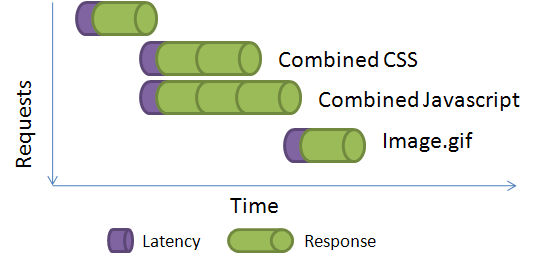
Here you can see how much improvement you get if you can combine multiple javascripts and css into one.

In a typical web page, you will see many javascripts referenced:

<script type="text/javascript" src="/Content/JScript/jquery.js">
<script type="text/javascript" src="/Content/JScript/jDate.js">
<script type="text/javascript" src="/Content/JScript/jQuery.Core.js">
<script type="text/javascript" src="/Content/JScript/jQuery.Delegate.js">
<script type="text/javascript" src="/Content/JScript/jQuery.Validation.js">

Instead of these individual < script> tags, you can
use only one < script> tag to serve the whole set of
scripts using an Http Handler:

<script type="text/javascript" 
    src="HttpCombiner.ashx?s=jQueryScripts&t=text/javascript&v=1" >

The Http Handler reads the file names defined in a configuration
and combines all those files and delivers as one response. It
delivers the response as gzip compressed to save bandwidth.
Moreover, it generates proper cache header to cache the response in
browser cache, so that, browser does not request it again on future
visits.

You can find details about the HttpHandler from this
CodeProject article:

http://www.codeproject.com/KB/aspnet/HttpCombine.aspx

You can also get the latest code from this code site:

http://code.msdn.microsoft.com/HttpCombiner

That’s it! Make your website faster to load, get more users and
earn more revenue.