You can setup continuous integration and automated deployment
for your web application using CruiseControl.NET, Subversion,
MSBuild and Robocopy. I will show you how you can automatically
build the entire solution, email build report to developers and QA,
deploy latest code in IIS all using CruiseControl.NET every N
minutes.
First get the following:
- CruiseControl.NET
Subversion (install the command line tools and add the
Subversion bin path to PATH environment variable)- Robocopy (Windows Vista/2008 has it built-in, here’s the link
for
Windows 2003)
- Install .NET Framework. You need it for MSBuild.
You will learn how I have configured Continuous Integration and
Deployment for my open source AJAX Portal project www.Dropthings.com. The code is
hosted at CodePlex. When some developer makes a commit,
CruiseControl downloads the latest code, builds the entire
solution, emails build report and then deploys the latest web site
to IIS 6.0.
After installing CruiseControl.NET, go to Programs -> Cruise Control ->
CruiseControl.NET Config.
Now keep copying and pasting the following XML blocks and make
sure you understand each block and make necessary changes:
1: <cruisecontrol>
2: <project name="Dropthings" queue="DropthingsQueue" queuePriority="1">
3:
7: <workingDirectory>d:ccdropthingscodetrunkworkingDirectory>
8:
9: <artifactDirectory>d:ccdropthingsartifactartifactDirectory>
10: <category>Dropthingscategory>
11:
12: <webURL>http://localhost/ccnet/webURL>
13: <modificationDelaySeconds>60modificationDelaySeconds>
14: <labeller type="defaultlabeller">
15: <prefix>0.1.prefix>
16: <incrementOnFailure>trueincrementOnFailure>
17: <labelFormat>000labelFormat>
18: labeller>
19: <state type="state" directory="State" />
First change the working directory. It needs to be the path of
the folder where you will have the solution downloaded. I generally
create folder structure like this:
- D:CC – Root for all CC.NET enabled projects
- ProjectName – Root project folder
- Code – Code folder where code is downloaded from
subversion
- Artifact – CC.NET generates a lot of stuff. All goes
here.
Next comes the Subversion integration block:
1: <sourcecontrol type="svn">
2:
3: <trunkUrl>http://localhost:8081/tfs02.codeplex.com/dropthings/trunktrunkUrl>
4: <workingDirectory>workingDirectory>
5: <username>***** SUBVERSION USER NAME *****username>
6: <password>***** SUBVERSION PATH *****password>
7: sourcecontrol>
Here specify the subversion location where you want to download
code to the working folder. You should download the entire solution
because you will be building the entire solution using MSBuild
soon.
I left empty.
This means whatever is specified earlier in the is
used. Otherwise you can put some relative folder path here or any
absolute folder.
Now we start building the tasks that CC.NET executes – Build,
Email, and Deploy.
1: <tasks>
2: <artifactcleanup cleanUpMethod="KeepLastXBuilds" cleanUpValue="5" />
3: <modificationWriter>
4: <filename>mods.xmlfilename>
5: <path>path>
6: modificationWriter>
7:
8:
9: <msbuild>
10: <executable>C:windowsMicrosoft.NETFramework64v3.5MSBuild.exeexecutable>
11: <workingDirectory>workingDirectory>
12: <projectFile>Dropthings.msbuildprojectFile>
13: <targets>Buildtargets>
14: <timeout>300timeout>
15: <logger>C:Program Files (x86)CruiseControl.NETserverThoughtWorks.CruiseControl.MsBuild.dlllogger>
16: msbuild>
This block first says, keep artifacts for last 5 build and
remove olders. Artifacts are like build reports, logs etc. You can
increase the value for longer history.
Then the most important task. The
executable path is to the MSBuild.exe. I am using .NET 3.5
Framework 64bit edition. You might have .NET 2.0 and 32bit version.
So, set the right path here for the MSbuild.exe.
maps to a
MSBuild file. It’s a skeleton MSBuild file which basically says
build this Visual Studio solution file. Here’s how the msbuild file
looks like:
<Project DefaultTargets="Build" xmlns="http://schemas.microsoft.com/developer/msbuild/2003">
<Target Name="Build">
<MSBuild Projects="Dropthings.sln" Targets="Rebuild" />
Target>
Project>
The Dropthings.msbuild and
Dropthings.sln file
exists in the same trunk folder. This file says – build
Dropthings.sln and do a rebuild.
Now you got the build done. Next is to deploy it. You will be
using robocopy to copy files from the code folder to a destination
folder which is mapped in IIS to a website. Robocopy will do a
synchronization of the directories. It will add new files,
overwrite old files and removes files from destination folder which
no longer exists in the source folder.
Before you can deploy, you need to stop the website or restart
IIS. Otherwise some files may be in use and you will not be able to
delete or overwrite the files. Here’s how to stop IIS using the
iisreset command
line tool:
<exec>
<executable>iisresetexecutable>
<buildArgs>/stopbuildArgs>
exec>
If you do not want to stop the entire IIS, instead just stop a
website and recycle an application pool, you can use the iisweb.vbs
script for stopping a website and iisapp.vbs script for recycling
application pool. Here’s an example:
<exec>
<executable>iiswebexecutable>
<buildArgs>/stop "Dropthings"buildArgs>
exec>
<exec>
<executable>iisappexecutable>
<buildArgs> /a "Dropthings" /rbuildArgs>
exec>
You need to first register cscript as the default script
runtime. In order to do this, go to command line and enter iisweb.
It will tell you that it cannot use wscript to run this script and
it needs to make cscript default. Let it make cscript as
default.
Now the time to do the deployment of latest web site files. The
following task launches robocopy to do the deployment:
<exec>
<executable>robocopy.exeexecutable>
<baseDirectory>DropthingsbaseDirectory>
<buildArgs>. d:ccDropthingsDeploy *.* /E /XA:H /PURGE /XO /XD ".svn" /NDL /NC /NS /NPbuildArgs>
<buildTimeoutSeconds>60buildTimeoutSeconds>
<successExitCodes>1,0successExitCodes>
exec>
First you need to correct the robocopy.exe path. For Windows
Vista/Windows 2008, keep it as it is. For Windows 2003, you need to
specify the full path. You also need to remove the (x86) from the
path if you have 32bit OS.
Next is the . This is
relative to the working directory. It’s the path of the website
folder. Dropthings website folder is located under the Dropthings
folder under trunk. So, I have specified Dropthings as the
subfolder where the website files are located. You need to specify
your project’s website folder’s relative path here form the
.
Next change the path in the node. First
one is the source “.” which you keep as it is. It means copy files
from the baseDirectory. Next is the
absolute path to the deployment folder where the web site is mapped
in IIS. You can use both relative or absolute path here. While
using relative path, just keep in mind the robocopy is running from
the folder.
After the path keep the *.* and the remaining flags intact. The
flags mean:
- Copy all subdirectories /E
- Copy hidded files /XA:H
- Do not copy old files /XO
- Exclude .svn directory while copying files /XD “.svn”
- Do not show list of files and directories being copie /NDL,
/NC, /NP
After the deployment, you need to turn IIS back on or start the
website that you stopped:
<exec>
<executable>iisresetexecutable>
<buildArgs>/startbuildArgs>
exec>
Now we got the build and deployment done. Next is to email a
nice report to developers and QA. If build succeeds, email both
developers and QA so that they can check out the latest build. But
if build fails, email only developers.
<publishers>
<rss/>
<xmllogger />
<statistics />
<email from="admin@yourcompany.com" mailhost="localhost" mailport="25" includeDetails="TRUE"
mailhostUsername="" mailhostPassword="" useSSL="FALSE">
<users>
<user name="Developer1" group="devs" address="dev1@yourcompany.com"/>
<user name="Developer2" group="devs" address="dev2@yourcompany.com"/>
<user name="Developer3" group="devs" address="dev3@yourcompany.com"/>
<user name="QA1" group="qa" address="qa1@yourcompany.com"/>
<user name="QA2" group="qa" address="qa2@yourcompany.com"/>
<user name="QA3" group="qa" address="qa3@yourcompany.com"/>
users>
<groups>
<group name="devs" notification="Always"/>
<group name="qa" notification="Success"/>
groups>
<converters>
converters>
<modifierNotificationTypes>
<NotificationType>AlwaysNotificationType>
modifierNotificationTypes>
email>
<modificationHistory onlyLogWhenChangesFound="true" />
publishers>
First you need to change the tab where you
specify the from address, mail server name, and optionally a user
account for the email address that you need to use to send out
emails.
Then edit the node and put your
developers and QA.
That’s it! You got the configuration file done. Next step is to
launch the CruiseControl.NET from Programs -> CruiseControl.NET
-> CruiseControl.NET. It will launch a process that will execute
the tasks according to the configuration. On Windows Vista, you
will have to run it with Administrative privilege.
There’s also a Windows Service that gets installed. It’s named
CruiseControl.NET. You can start the service as well on a server
and go to sleep. It will do continuous integration and automated
deployment for you.
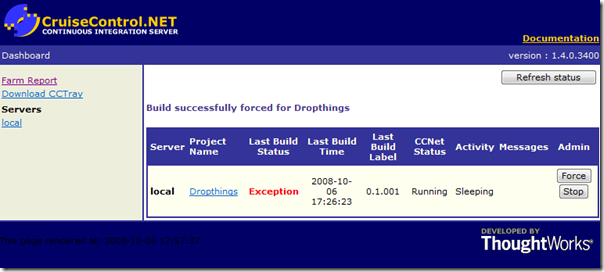
There’s also a web based Dashboard that you can use to force a
build or stop a build or see detail build reports.
You can create multiple projects. You can have one project to
build trunk code only, but do no deployment. Then you can create
another project to build, deploy some branch that’s ready for
production. You can create another project to build and deploy on
QA server and so on.
Here’s the full configuration file that you can use as your
baseline.

