ASP.NET website Continuous Integration+Deployment using CruiseControl.NET, Subversion, MSBuild and Robocopy

You can setup continuous integration and automated deployment
for your web application using CruiseControl.NET, Subversion,
MSBuild and Robocopy. I will show you how you can automatically
build the entire solution, email build report to developers and QA,
deploy latest code in IIS all using CruiseControl.NET every N
minutes.

First get the following:

  • CruiseControl.NET

  • Subversion
    (install the command line tools and add the
    Subversion bin path to PATH environment variable)
  • Robocopy (Windows Vista/2008 has it built-in, here’s the link
    for
    Windows 2003
    )
  • Install .NET Framework. You need it for MSBuild.

You will learn how I have configured Continuous Integration and
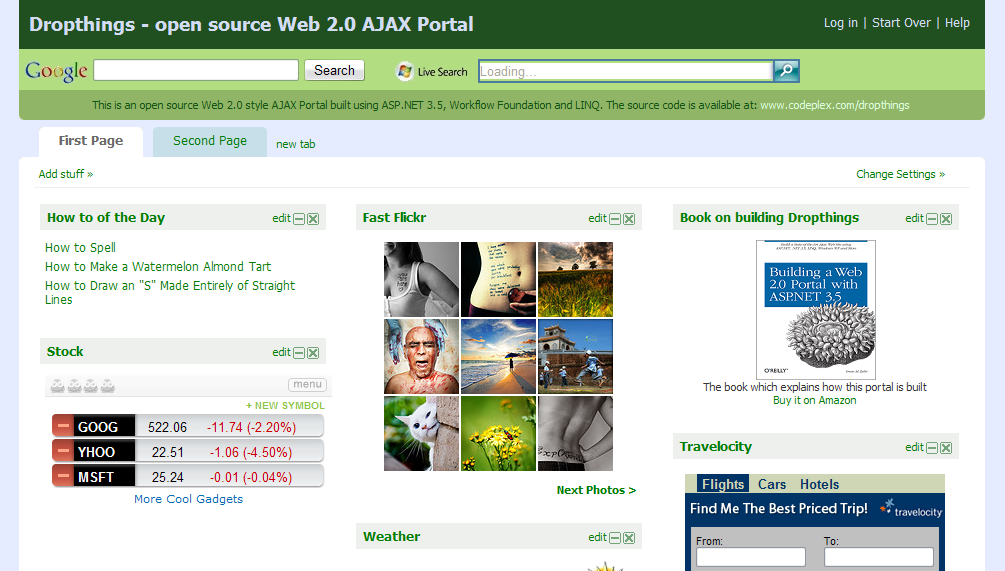
Deployment for my open source AJAX Portal project www.Dropthings.com. The code is
hosted at CodePlex. When some developer makes a commit,
CruiseControl downloads the latest code, builds the entire
solution, emails build report and then deploys the latest web site
to IIS 6.0.

After installing CruiseControl.NET, go to Programs -> Cruise Control ->
CruiseControl.NET Config
.

Now keep copying and pasting the following XML blocks and make
sure you understand each block and make necessary changes:


   1: <cruisecontrol>

   2:     <project name="Dropthings" queue="DropthingsQueue" queuePriority="1">

   3:         

   7:         <workingDirectory>d:ccdropthingscodetrunkworkingDirectory>

   8:         

   9:         <artifactDirectory>d:ccdropthingsartifactartifactDirectory>

  10:         <category>Dropthingscategory>

  11:         

  12:         <webURL>http://localhost/ccnet/webURL>

  13:         <modificationDelaySeconds>60modificationDelaySeconds>

  14:         <labeller type="defaultlabeller">

  15:             <prefix>0.1.prefix>

  16:             <incrementOnFailure>trueincrementOnFailure>

  17:             <labelFormat>000labelFormat>

  18:         labeller>

  19:         <state type="state" directory="State" />

First change the working directory. It needs to be the path of
the folder where you will have the solution downloaded. I generally
create folder structure like this:

  • D:CC – Root for all CC.NET enabled projects
    • ProjectName – Root project folder
      • Code – Code folder where code is downloaded from
        subversion
      • Artifact – CC.NET generates a lot of stuff. All goes
        here.

Next comes the Subversion integration block:


   1: <sourcecontrol type="svn">

   2:     

   3:     <trunkUrl>http://localhost:8081/tfs02.codeplex.com/dropthings/trunktrunkUrl>

   4:     <workingDirectory>workingDirectory>

   5:     <username>***** SUBVERSION USER NAME *****username>

   6:     <password>***** SUBVERSION PATH *****password>

   7: sourcecontrol>

Here specify the subversion location where you want to download
code to the working folder. You should download the entire solution
because you will be building the entire solution using MSBuild
soon.

I left empty.
This means whatever is specified earlier in the is
used. Otherwise you can put some relative folder path here or any
absolute folder.

Now we start building the tasks that CC.NET executes – Build,
Email, and Deploy.


   1: <tasks>

   2:     <artifactcleanup   cleanUpMethod="KeepLastXBuilds"   cleanUpValue="5" />

   3:     <modificationWriter>

   4:         <filename>mods.xmlfilename>

   5:         <path>path>

   6:     modificationWriter>

   7:

   8:     

   9:     <msbuild>

  10:         <executable>C:windowsMicrosoft.NETFramework64v3.5MSBuild.exeexecutable>

  11:         <workingDirectory>workingDirectory>

  12:         <projectFile>Dropthings.msbuildprojectFile>

  13:         <targets>Buildtargets>

  14:         <timeout>300timeout>

  15:         <logger>C:Program Files (x86)CruiseControl.NETserverThoughtWorks.CruiseControl.MsBuild.dlllogger>

  16:     msbuild>

This block first says, keep artifacts for last 5 build and
remove olders. Artifacts are like build reports, logs etc. You can
increase the value for longer history.

Then the most important task. The
executable path is to the MSBuild.exe. I am using .NET 3.5
Framework 64bit edition. You might have .NET 2.0 and 32bit version.
So, set the right path here for the MSbuild.exe.

maps to a
MSBuild file. It’s a skeleton MSBuild file which basically says
build this Visual Studio solution file. Here’s how the msbuild file
looks like:


<Project DefaultTargets="Build" xmlns="http://schemas.microsoft.com/developer/msbuild/2003">

  <Target Name="Build">


    <MSBuild Projects="Dropthings.sln" Targets="Rebuild" />

  Target>

Project>

The Dropthings.msbuild and
Dropthings.sln file
exists in the same trunk folder. This file says – build
Dropthings.sln and do a rebuild.

Now you got the build done. Next is to deploy it. You will be
using robocopy to copy files from the code folder to a destination
folder which is mapped in IIS to a website. Robocopy will do a
synchronization of the directories. It will add new files,
overwrite old files and removes files from destination folder which
no longer exists in the source folder.

Before you can deploy, you need to stop the website or restart
IIS. Otherwise some files may be in use and you will not be able to
delete or overwrite the files. Here’s how to stop IIS using the
iisreset command
line tool:


<exec>

    <executable>iisresetexecutable>

    <buildArgs>/stopbuildArgs>

exec>

If you do not want to stop the entire IIS, instead just stop a
website and recycle an application pool, you can use the iisweb.vbs
script for stopping a website and iisapp.vbs script for recycling
application pool. Here’s an example:


<exec>

    <executable>iiswebexecutable>

    <buildArgs>/stop "Dropthings"buildArgs>

exec>


<exec>

    <executable>iisappexecutable>

    <buildArgs> /a "Dropthings" /rbuildArgs>

exec>

You need to first register cscript as the default script
runtime. In order to do this, go to command line and enter iisweb.
It will tell you that it cannot use wscript to run this script and
it needs to make cscript default. Let it make cscript as
default.

Now the time to do the deployment of latest web site files. The
following task launches robocopy to do the deployment:


<exec>


    <executable>robocopy.exeexecutable>

    <baseDirectory>DropthingsbaseDirectory>

    <buildArgs>. d:ccDropthingsDeploy *.* /E /XA:H /PURGE /XO /XD ".svn" /NDL /NC /NS /NPbuildArgs>

    <buildTimeoutSeconds>60buildTimeoutSeconds>

    <successExitCodes>1,0successExitCodes>

exec>

First you need to correct the robocopy.exe path. For Windows
Vista/Windows 2008, keep it as it is. For Windows 2003, you need to
specify the full path. You also need to remove the (x86) from the
path if you have 32bit OS.

Next is the . This is
relative to the working directory. It’s the path of the website
folder. Dropthings website folder is located under the Dropthings
folder under trunk. So, I have specified Dropthings as the
subfolder where the website files are located. You need to specify
your project’s website folder’s relative path here form the
.

Next change the path in the node. First
one is the source “.” which you keep as it is. It means copy files
from the baseDirectory. Next is the
absolute path to the deployment folder where the web site is mapped
in IIS. You can use both relative or absolute path here. While
using relative path, just keep in mind the robocopy is running from
the folder.

After the path keep the *.* and the remaining flags intact. The
flags mean:

  • Copy all subdirectories /E
  • Copy hidded files /XA:H
  • Do not copy old files /XO
  • Exclude .svn directory while copying files /XD “.svn”
  • Do not show list of files and directories being copie /NDL,
    /NC, /NP

After the deployment, you need to turn IIS back on or start the
website that you stopped:


<exec>

    <executable>iisresetexecutable>

    <buildArgs>/startbuildArgs>

exec>


Now we got the build and deployment done. Next is to email a
nice report to developers and QA. If build succeeds, email both
developers and QA so that they can check out the latest build. But
if build fails, email only developers.


<publishers>

    <rss/>

    <xmllogger />

    <statistics />


    <email from="admin@yourcompany.com" mailhost="localhost" mailport="25" includeDetails="TRUE"

           mailhostUsername="" mailhostPassword="" useSSL="FALSE">


        <users>

            <user name="Developer1" group="devs" address="dev1@yourcompany.com"/>

            <user name="Developer2" group="devs" address="dev2@yourcompany.com"/>

            <user name="Developer3" group="devs" address="dev3@yourcompany.com"/>


            <user name="QA1" group="qa" address="qa1@yourcompany.com"/>

            <user name="QA2" group="qa" address="qa2@yourcompany.com"/>

            <user name="QA3" group="qa" address="qa3@yourcompany.com"/>


        users>


        <groups>

            <group name="devs" notification="Always"/>

            <group name="qa" notification="Success"/>

        groups>


        <converters>


        converters>


        <modifierNotificationTypes>

            <NotificationType>AlwaysNotificationType>

        modifierNotificationTypes>


    email>

    <modificationHistory  onlyLogWhenChangesFound="true" />

publishers>

First you need to change the tab where you
specify the from address, mail server name, and optionally a user
account for the email address that you need to use to send out
emails.

Then edit the node and put your
developers and QA.

That’s it! You got the configuration file done. Next step is to
launch the CruiseControl.NET from Programs -> CruiseControl.NET
-> CruiseControl.NET. It will launch a process that will execute
the tasks according to the configuration. On Windows Vista, you
will have to run it with Administrative privilege.

There’s also a Windows Service that gets installed. It’s named
CruiseControl.NET. You can start the service as well on a server
and go to sleep. It will do continuous integration and automated
deployment for you.

There’s also a web based Dashboard that you can use to force a
build or stop a build or see detail build reports.


image

You can create multiple projects. You can have one project to
build trunk code only, but do no deployment. Then you can create
another project to build, deploy some branch that’s ready for
production. You can create another project to build and deploy on
QA server and so on.


Here’s the full configuration file
that you can use as your
baseline.


kick it on DotNetKicks.com

Best practices for creating websites in IIS 6.0

Every time I create an IIS website, I do some steps, which I
consider as best practice for creating any IIS website for better
performance, maintainability, and scalability. Here’ re the things
I do:

Create a separate application pool for each web
application

I always create separate app pool for each web app because I can
select different schedule for app pool recycle. Some heavy traffic
websites have long recycle schedule where low traffic websites have
short recycle schedule to save memory. Moreover, I can choose
different number of processes served by the app pool. Applications
that are made for web garden mode can benefit from multiple process
where applications that use in-process session, in memory cache
needs to have single process serving the app pool. Hosting all my
application under the DefaultAppPool does not give me the
flexibility to control these per site.

The more app pool you create, the more ASP.NET threads you make
available to your application. Each w3wp.exe has it’s own
thread pool. So, if some application is congesting particular
w3wp.exe process, other applications can run happily on
their separate w3wp.exe instance, running under separate app
pool. Each app pool hosts its own w3wp.exe instance.

So, my rule of thumb: Always create new app pool for new web
applications and name the app pool based on the site’s domain name
or some internal name that makes sense. For example, if you are
creating a new website alzabir.com, name the app pool alzabir.com
to easily identify it.

Another best practice: Disable the DefaultAppPool so that
you don’t mistakenly keep adding sites to
DefaultAppPool.


image

First you create a new application pool. Then you create a new
Website or Virtual Directory, go to Properties -> Home Directory
tab -> Select the new app pool.


image

Customize Website properties for performance,
scalability and maintainability

First you map the right host headers to your website. In order
to do this, go to WebSite tab and click on “Advanced” button. Add
mapping for both domain.com and www.domain.com. Most of the time,
people forget to map the domain.com. Thus many visitors skip typing
the www prefix and get no page served.


image

Next turn on some log entries:


image

These are very handy for analysis. If you want to measure your
bandwidth consumption for specific sites, you need the Bytes Sent.
If you want to measure the execution time of different pages and
find out the slow running pages, you need Time Taken. If you want
to measure unique and returning visitors, you need the Cookie. If
you need to know who is sending you most traffic – search engines
or some websites, you need the Referer. Once these entries are
turned on, you can use variety of Log Analysis tools to do the
analysis. For example, open source AWStats.

But if you are using Google Analytics or something else, you
should have these turned off, especially the Cookie and Referer
because they take quite some space on the log. If you are using
ASP.NET Forms Authentication, the gigantic cookie coming with every
request will produce gigabytes of logs per week if you have a
medium traffic website.


image

This is kinda no brainer. I add Default.aspx as the default
content page so that, when visitors hit the site without any .aspx
page name, e.g. alzabir.com, they get the default.aspx served.


image

Things I do here:

  • Turn on Content Expiration. This makes static files remain in
    browser cache for 30 days and browser serves the files from its own
    cache instead of hitting the server. As a result, when your users
    revisit, they don’t download all the static files like images,
    javascripts, css files again and again. This one setting
    significantly improves your site’s performance.
  • Remove the X-Powered-By: ASP.NET header. You really
    don’t need it unless you want to attach Visual Studio Remote
    Debugger to your IIS. Otherwise, it’s just sending 21 bytes on
    every response.
  • Add “From” header and set the server name. I do this on each
    webserver and specify different names on each box. It’s handy to
    see from which servers requests are being served. When you are
    trying to troubleshoot load balancing issues, it comes handy to see
    if a particular server is sending requests.


image

I set the 404 handler to some ASPX so that I can show some
custom error message. There’s a 404.aspx which shows some nice
friendly message and suggests some other pages that user can visit.
However, another reason to use this custom mapping is to serve
extensionless URL from IIS.
Read this blog post for details
.


image

Make sure to set ASP.NET 2.0 for your ASP.NET 2.0, 3.0 and 3.5
websites.

Finally, you must, I repeat you “MUST”
turn on IIS 6.0 gzip compression
. This turns on the Volkswagen
V8 engine that is built into IIS to make your site screaming
fast.

kick it on DotNetKicks.com

Create ASP.NET MVC Controllers under Namespace and specific URL

When you have a lot of controllers, you need to organize them
under Namespaces. Also, it is better to put controllers under
subfolders in order to organize them properly and have some
meaningful URL for them like /Admin/User where Admin
is the subfolder and User is the controller. For example,
you might have a lot of controllers that are APIs exposed by your
web app, not regular pages. So, you might want to put them under
/API/ folder. You also want to make sure no one can access
those controllers from the root url. For example, no one must call
/User/GetUserList instead they must call
/API/User/GetUserList

ASP.NET MVC default routing and Controller Factory is very
greedy, it ignores the subfolders inside the “Controllers” folder.
There’s a DefaultControllerFactory class in ASP.NET MVC
which traverses all controllers under the “Controller” folder and
creates a cache using just the class name as the key. So, it
ignores any namespace or any subfolder where you have put the
controller. So, I created a derivative of the default controller
factory and created a new factory that checks if the requested
controller belongs to any specific namespace and whether that
controller must be inside a specific subfolder. You can map
/Admin folder to respond to all controllers that are under
then YourWebApp.Admin namespace. Similarly, you can map
/API folder to respond to all controllers that are under the
YourWebApp.API namespace. None of these controllers can be
accessed outside the specified URL. Here’s the factory that does
it:


ProtectedNamespaceController Factory that replaces DefaultControllerFactory

This controller checks the namespace of the controller being
returned by ASP.NET MVC’s default implementation and ensures the
requested URL is the right url where controllers from the namespace
can be accessed. So, this means if the controller matches
MvcWebAPI.API.UserController, it ensures the URL being
requested must be /MvcWebAPI/API/User. It will return null
if the URL was something else like /MvcWebAPI/User or
/MvcWebAPI/SomeotherFolder/User.

Here’s how you use it form Global.asax:


Using ProtectedNamespaceControllerFactory from Global.asax

You create a mapping for a Namespace and the subfolder it must
belong to. Then you register the new Controller Factory as the
default controller factory.

Now the second catch is, the default Route for the
{controller}/{action}/{id} won’t work for you. You need to
create a specific router that starts with the subfolder name. For
example, API/{controller}/{action}


Creating a new route for the Controllers under the /API folder

Here’ two things to notice:

  • The use of PathStartWith routing constraint, which I
    will explain soon
  • The last parameter which tells the route to include the API
    namespace for this route. Otherwise it can’t find the controllers
    in the API namespace

So, the PathStartsWith routing constraint ensures this
route gets hit only when the requested URL is under the
/API/ folder. For any other URL, it returns false and thus
the routing handler skips this route.


image

It just does a comparison on the AbsolutePath of the
current request URL to ensure the URL starts with the specified
match.

Similarly, we need to tell the Default route to ignore all paths
with /API. Here’s how to do it:


image

That’s it. Enjoy the full code from:

http://code.msdn.microsoft.com/MvcWebAPI

Read my previous post on creating Web API using ASP.NET MVC that
can consume and expose Json and Xml:


Create REST API using ASP.NET MVC that speaks both Json and plain
Xml

Note: incase you already read it, I have published new code that
you should download.

kick it on DotNetKicks.com

Create REST API using ASP.NET MVC that speaks both Json and plain Xml

UPDATE: There’s a newer article on this that shows how to create a truly RESTful API and website using the same ASP.NET MVC code.

www.codeproject.com/KB/aspnet/aspnet_mvc_restapi.aspx

ASP.NET MVC Controllers can directly return objects and collections, without rendering a view, which makes it quite appealing for creating REST like API. The nice extensionless Url provided by MVC makes it handy to build REST services, which means you can create APIs with smart Url like “something.com/API/User/GetUserList”

There are some challenges to solve in order to expose REST API:

  • Based on who is calling your API, you need to be able to speak both Json and plain old Xml (POX). If the call comes from an AJAX front-end, you need to return objects serialized as Json. If it’s coming from some other client, say a PHP website, you need to return plain Xml.
  • Similarly you need to be able to understand REST, Json and plain Xml calls. Someone can hit you using REST url, someone can post a Json payload or someone can post Xml payload.

I have created an ObjectResult class which takes an object and generates Xml or Json output automatically looking at the Content-Type header of HttpRequest. AJAX calls send Content-Type=application/json. So, it generates Json as response in that case, but when Content-Type is something else, it does simple Xml Serialzation.

image

Here’s the ObjectResult that you can use from Controllers to return objects and it takes care of proper serialization method. Above shows the Json serialization, which is quite simple.XmlSerialization is a bit complex though:

image

Things to note here:

  • You have to force UTF8 encoding. Otherwise it produces UTF16 output.
  • XML Declaration is skipped because that’s not quite necessary. Wastes bandwidth. If you need it, turn it on.
  • I have turned on indenting for better readability. You can turn it off to save bandwidth.

Some of you might be boiling inside looking at my obscure coding style. I love this style! I am spoiled by jQuery. I wish there was a cQuery. I actually started writing one, but it never saw day light just like my hundred other open source attempts.

Now back to Object Serialization, we got the serialization done. Now you can return objects from Controller easily:

image

You can use the test web project to call these methods and see the result:

image

So far you have seen simple object and list serialization. A best practice is to return a common result object that has some status, message and then the real payload. It’s handy when you only need to return some error but no object or list. I use a common Result object that has three properties – ErrorCode (0 by default means success), Message (a string data type) andData which is the real object.

image

When you want to return only a result with error message, you can do this:

image

This produces a result like this:

image

No payload here. So, the return format is always consistent. Those who are consuming service can write a common Xml or Json parsing code to consume both success and failure response. Those who are building API for their website, I humbly request you to return consistent response for both success and failure. It makes our life so easier.

So, far we have only returned objects and lists. Now we need to accept Json and Xml payload, delivered via HTTP POST. Sometimes your client might want to upload a collection of objects in one shot for batch processing. So, they can upload objects using either Json or Xml format. There’s no native support in ASP.NET MVC to automatically parse posted Json or Xml and automatically map to Action parameters. So, I wrote a filter that does it.

image

This filter intercepts calls going to Action methods and checks whether client has posted Xml or Json. Based on what has been posted, it uses DataContractJsonSerializer or simpleXmlSerializer to convert the payload to objects or collections.

You use this attribute on Action methods like this:

image

The attribute expects a parameter name where it stores the deserialized object/collection. It also expects a root type that it needs to pass to the deserializer. If you are expecting a single object, specify typeof(SingeObject). If you are expecting a list of objects, specify an array of that object like typeof(SingleObject[])

You can test the project live at this URL:

http://labs.dropthings.com/MvcWebAPI

The code is also available at:

http://code.msdn.microsoft.com/MvcWebAPI

Enjoy!

————

Here’s an Eid gift for my believer brothers. Check out this amazing sitewww.quranexplorer.com/. You will get online recitation, translation – verse by verse. The recitation of Mishari Rashid is something you have to listen to to believe. Try these two recitations to see what I mean:

Sura 97 – Verse 1
Sura 114 – Verse 1

Press the “Play” icon at bottom left (hard to find).

kick it on DotNetKicks.com

HTTP handler to combine multiple files, cache and deliver compressed output for faster page load

It’s a good practice to use many small Javascript and CSS files
instead of one large Javascript/CSS file for better code
maintainability, but bad in terms of website performance. Although
you should write your Javascript code in small files and break
large CSS files into small chunks but when browser requests those
javascript and css files, it makes one Http request per file. Every
Http Request results in a network roundtrip form your browser to
the server and the delay in reaching the server and coming back to
the browser is called latency. So, if you have four javascripts and
three css files loaded by a page, you are wasting time in seven
network roundtrips. Within USA, latency is average 70ms. So, you
waste 7×70 = 490ms, about half a second of delay. Outside USA,
average latency is around 200ms. So, that means 1400ms of waiting.
Browser cannot show the page properly until Css and Javascripts are
fully loaded. So, the more latency you have, the slower page
loads.

Here’s a graph that shows how each request latency adds up and
introduces significant delay in page loading:

You can reduce the wait time by using a CDN. my previous blog post about using CDN. However, a better

solution is to deliver multiple files over one request using an
HttpHandler that combines several files and delivers as one
output. So, instead of putting many < script> or tag, you just put one < script> and one tag, and
point them to the HttpHandler. You tell the handler which
files to combine and it delivers those files in one response. This
saves browser from making many requests and eliminates the
latency.

Here you can see how much improvement you get if you can combine multiple javascripts and css into one.

In a typical web page, you will see many javascripts referenced:

<script type="text/javascript" src="/Content/JScript/jquery.js">
<script type="text/javascript" src="/Content/JScript/jDate.js">
<script type="text/javascript" src="/Content/JScript/jQuery.Core.js">
<script type="text/javascript" src="/Content/JScript/jQuery.Delegate.js">
<script type="text/javascript" src="/Content/JScript/jQuery.Validation.js">

Instead of these individual < script> tags, you can
use only one < script> tag to serve the whole set of
scripts using an Http Handler:

<script type="text/javascript" 
    src="HttpCombiner.ashx?s=jQueryScripts&t=text/javascript&v=1" >

The Http Handler reads the file names defined in a configuration
and combines all those files and delivers as one response. It
delivers the response as gzip compressed to save bandwidth.
Moreover, it generates proper cache header to cache the response in
browser cache, so that, browser does not request it again on future
visits.

You can find details about the HttpHandler from this
CodeProject article:

http://www.codeproject.com/KB/aspnet/HttpCombine.aspx

You can also get the latest code from this code site:

http://code.msdn.microsoft.com/HttpCombiner

That’s it! Make your website faster to load, get more users and
earn more revenue.


Loading static content in ASP.NET pages from different domain for faster parallel download

Generally we put static content (images, css, js) of our website
inside the same web project. Thus they get downloaded from the same
domain like www.dropthings.com. There are three
problems in this approach:

  • They occupy connections on the same domain www.dropthings.com and thus other
    important calls like Web service call do not get a chance to happen
    earlier as browser can only make two simultaneous connections per
    domain.
  • If you are using ASP.NET Forms Authentication, then you have
    that gigantic Forms Authentication cookie being sent with every
    single request on www.dropthings.com. This cookie
    gets sent for all images, CSS and JS files, which has no use for
    the cookie. Thus it wastes upload bandwidth and makes every request
    slower. Upload bandwidth is very limited for users compared to
    download bandwidth. Generally users with 1Mbps download speed has
    around 128kbps upload speed. So, adding another 100 bytes on the
    request for the unnecessary cookie results in delay in sending the
    request and thus increases your site load time and the site feels
    slow to respond.
  • It creates enormous IIS Logs as it records the cookies for each
    static content request. Moreover, if you are using Google Analytics
    to track hits to your site, it issues four big cookies that gets
    sent for each and every image, css and js files resulting in slower
    requests and even larger IIS log entries.

Let’s see the first problem, browser’s two connection limit. See
what happens when content download using two HTTP requests in
parallel:


image

This figure shows only two files are downloaded in parallel. All
the hits are going to the same domain e.g. www.dropthings.com. As you see,
only two call can execute at the same time. Moreover, due to
browser’s way of handling script tags, once a script is being
downloaded, browser does not download anything else until the
script has downloaded and executed.

Now, if we can download the images from different domain, which
allows browser to open another two simultaneous connections, then
the page loads a lot faster:


image

You see, the total page downloads 40% faster. Here only the
images are downloaded from a different domain e.g.
“s.dropthings.com”, thus the calls for the script, CSS and
webservices still go to main domain e.g. www.dropthings.com

The second problem for loading static content from same domain
is the gigantic forms authentication cookie or any other cookie
being registered on the main domain e.g. www subdomain. Here’s how
Pageflake’s website’s request looks like with the forms
authentication cookie and Google Analytics cookies:


image

You see a lot of data being sent on the request header which has
no use for any static content. Thus it wastes bandwidth, makes
request reach server slower and produces large IIS logs.

You can solve this problem by loading static contents from
different domain as we have done it at Pageflakes by loading static
contents from a different domain e.g. flakepage.com. As the cookies
are registered only on the www subdomain, browser does not send the
cookies to any other subdomain or domain. Thus requests going to
other domains are smaller and thus faster.

Would not it be great if you could just plugin something in your
ASP.NET project and all the graphics, CSS, javascript URLs
automatically get converted to a different domain URL without you
having to do anything manually like going through all your ASP.NET
pages, webcontrols and manually changing the urls?

Here’s a nice HttpFilter that will do the exact thing.
You just configure in your web.config what prefix you want
to add in front of your javascript, css and images and the filter
takes care of changing all the links for you when a page is being
rendered.

First you add these keys in your web.config‘s
block that defines the prefix to inject
before the relative URL of your static content. You can define
three different prefix for images, javascripts and css:


image

So, you can download images from one domain, javascripts from
another domain and css from another domain in order to increase
parallel download. But beware, there’s the overhead of DNS lookup
which is significant. Ideally you should have max three unique
domains used in your entire page, one for the main domain and two
other domain.

Then you register the Filter on Application_BeginRequest
so that it intercepts all aspx pages:


image

That’s it! You will see all the tag’s
src attribute, < script> tag’s src
attribute, tag’s href attribute are
automatically prefixed with the prefix defined in
web.config

Here’s how the Filter works. First it intercepts the
Write method and then searches through the buffer if there’s
any of the tags. If found, it checks for the src or
href attribute and then sees if the URL is absolute or
relative. If relative, inserts the prefix first and then the
relative value follows.

The principle is relatively simple, but the code is far more
complex than it sounds. As you work with char[] in an
HttpFilter, you need to work with char[] array only,
no string. Moreover, there’s very high performance
requirement for such a filter because it processes each and every
page’s output. So, the filter will be processing megabytes of data
every second on a busy site. Thus it needs to be extremely fast. No
string allocation, no string comparison, no Dictionary or
ArrayList, no StringBuilder or MemoryStream.
You need to forget all these .NET goodies and go back to good old
Computer Science school days and work with arrays, bytes, char and
so on.

First, we run through the content array provided and see if
there’s any of the intended tag’s start.


image

Idea is to find all the image, script and link tags and see what
their src/href value is and inject the prefix if needed. The
WritePrefixIf(…) function does the work of parsing the
attribute. Some cool things to notice here is that, there’s
absolutely no string comparison here. Everything is done on the
char[] passed to the Write method.
image

This function checks if src/href attribute is found and
it writes the prefix right after the double quote if the value of
the prefix does not start with http://

Basically that’s it. The only other interesting thing is the
FindAttributeValuePos. It checks if the specified attribute
exists and if it does, finds the position of the value in the
content array so that content can be flushed up to the value
position.


image

Two other small functions that are worth mentioning are the
compare functions so that you can see, there’s absolutely no string
comparison involved in this entire filter:


image

Now the season finally, the remaining code in Write function
that solves several challenges like unfinished tags in a buffer.
It’s possible Write method will pass you a buffer where a tag has
just started, but did not end. Of you can get part of a tag like
and that’s it. So, these scenario needs to be
handled. Idea is to detect such unfinished tags and store them in a
temporary buffer. When next Write call happens, it will
combine the buffer and process it.


image

That’s it for the filter’s code.

Download the code
from here
. It’s just one class.

You can use this filter in conjunction with the
ScriptDeferFilter that I have showed in CodeProject
article which defers script loading after body and combines
multiple script tags into one
for faster download and better
compression and thus significantly faster web page load
performance.

In case you are wondering whether this is production
ready
, visit www.dropthings.com and you will see
static content downloads from s.dropthings.com using this
Filter.

Share this post :

kick it on DotNetKicks.com

Open Source ASP.NET 3.5 AJAX Portal – new and improved

Last week I released a new version of Dropthings, my open source
AJAX portal, that shows many fancy Web 2.0 features and showcases
extensive use of ASP.NET 3.5, Workflow Foundation, C# 3.0 new
language features, custom ASP.NET AJAX extenders, many performance
and scalability techniques. I have written
a book
on these topics as well.

The new version implements the following performance and
scalability improvement techniques:

Here’s how the new version looks:


Dropthings new version

Hope you like the new design and the performance and scalability
techniques that can significantly boost your ASP.NET website’s
quality. I highly recommend these techniques for ASP.NET websites.
These are easy to implement and makes a world of difference in
speed and smoothness for ASP.NET websites.

I am thinking about making an ASP.NET MVC version of this portal
using jQuery. Do you think it will be a hot area to explore?

Share this post :

kick it on DotNetKicks.com

Deploy ASP.NET MVC on IIS 6, solve 404, compression and performance problems

There are several problems with ASP.NET MVC application when
deployed on IIS 6.0:

  • Extensionless URLs give 404 unless some URL Rewrite module is
    used or wildcard mapping is enabled
  • IIS 6.0 built-in compression does not work for dynamic
    requests. As a result, ASP.NET pages are served uncompressed
    resulting in poor site load speed.
  • Mapping wildcard extension to ASP.NET introduces the following
    problems:

    • Slow performance as all static files get handled by ASP.NET and
      ASP.NET reads the file from file system on every call
    • Expires headers doesn’t work for static content as IIS does not
      serve them anymore. Learn about benefits of expires header from

      here
      . ASP.NET serves a fixed expires header that makes content
      expire in a day.
    • Cache-Control header does not produce max-age properly and thus
      caching does not work as expected. Learn about caching best
      practices from
      here
      .
  • After deploying on a domain as the root site, the homepage
    produces HTTP 404.

Problem 1: Visiting your website’s homepage gives 404 when
hosted on a domain

You have done the wildcard mapping, mapped .mvc extention to
ASP.NET ISAPI handler, written the route mapping for Default.aspx
or default.aspx (lowercase), but still when you visit your homepage
after deployment, you get:


image

You will find people banging their heads on the wall here:

Solution is to capture hits going to “/” and then rewrite it to
Default.aspx:


image

You can apply this approach to any URL that ASP.NET MVC is not
handling for you and it should handle. Just see the URL reported on
the 404 error page and then rewrite it to a proper URL.

Problem 2: IIS 6 compression is no longer working after
wildcard mapping

When you enable wildcard mapping, IIS 6 compression no longer
works for extensionless URL because IIS 6 does not see any
extension which is defined in IIS Metabase. You can learn about IIS
6 compression feature and how to configure it properly from

my earlier post
.

Solution is to use an HttpModule to do the compression for
dynamic requests.

Problem 3: ASP.NET ISAPI does not cache Static Files

When ASP.NET’s DefaultHttpHandler serves static files, it
does not cache the files in-memory or in ASP.NET cache. As a
result, every hit to static file results in a File read. Below is
the decompiled code in DefaultHttpHandler when it handles a
static file. As you see here, it makes a file read on every hit and
it only set the expiration to one day in future. Moreover, it
generates ETag for each file based on file’s modified date.
For best caching efficiency, we need to get rid of that
ETag, produce an expiry date on far future (like 30 days),
and produce Cache-Control header which offers better control
over caching.


image

So, we need to write a custom static file handler that will
cache small files like images, Javascripts, CSS, HTML and so on in
ASP.NET cache and serve the files directly from cache instead of
hitting the disk. Here are the steps:

  • Install an HttpModule that installs a Compression Stream
    on Response.Filter so that anything written on Response gets
    compressed. This serves dynamic requests.
  • Replace ASP.NET’s DefaultHttpHandler that listens on *.*
    for static files.
  • Write our own Http Handler that will deliver compressed
    response for static resources like Javascript, CSS, and HTML.


image

Here’s the mapping in ASP.NET’s web.config for the
DefaultHttpHandler. You will have to replace this with your
own handler in order to serve static files compressed and
cached.

Solution 1: An Http Module to compress dynamic requests

First, you need to serve compressed responses that are served by
the MvcHandler or ASP.NET’s default Page Handler. The
following HttpCompressionModule hooks on the
Response.Filter and installs a GZipStream or
DeflateStream on it so that whatever is written on the
Response stream, it gets compressed.


image

These are formalities for a regular HttpModule. The real
hook is installed as below:


image

Here you see we ignore requests that are handled by ASP.NET’s
DefaultHttpHandler and our own StaticFileHandler that
you will see in next section. After that, it checks whether the
request allows content to be compressed. Accept-Encoding
header contains “gzip” or “deflate” or both when browser supports
compressed content. So, when browser supports compressed content, a
Response Filter is installed to compress the output.

Solution 2: An Http Module to compress and cache static file
requests

Here’s how the handler works:

  • Hooks on *.* so that all unhandled requests get served by the
    handler
  • Handles some specific files like js, css, html, graphics files.
    Anything else, it lets ASP.NET transmit it
  • The extensions it handles itself, it caches the file content so
    that subsequent requests are served from cache
  • It allows compression of some specific extensions like js, css,
    html. It does not compress graphics files or any other
    extension.

Let’s start with the handler code:


image

Here you will find the extensions the handler handles and the
extensions it compresses. You should only put files that are text
files in the COMPRESS_FILE_TYPES.

Now start handling each request from
BeginProcessRequest.


image

Here you decide the compression mode based on
Accept-Encoding header. If browser does not support
compression, do not perform any compression. Then check if the file
being requested falls in one of the extensions that we support. If
not, let ASP.NET handle it. You will see soon how.


image

Calculate the cache key based on the compression mode and the
physical path of the file. This ensures that no matter what the URL
requested, we have one cache entry for one physical file. Physical
file path won’t be different for the same file. Compression mode is
used in the cache key because we need to store different copy of
the file’s content in ASP.NET cache based on Compression Mode. So,
there will be one uncompressed version, a gzip compressed version
and a deflate compressed version.

Next check if the file exits. If not, throw HTTP 404. Then
create a memory stream that will hold the bytes for the file or the
compressed content. Then read the file and write in the memory
stream either directly or via a GZip or Deflate stream. Then cache
the bytes in the memory stream and deliver to response. You will
see the ReadFileData and CacheAndDeliver functions
soon.


image

This function delivers content directly from ASP.NET cache. The
code is simple, read from cache and write to the response.

When the content is not available in cache, read the file bytes
and store in a memory stream either as it is or compressed based on
what compression mode you decided before:


image

Here bytes are read in chunk in order to avoid large amount of
memory allocation. You could read the whole file in one shot and
store in a byte array same as the size of the file length. But I
wanted to save memory allocation. Do a performance test to figure
out if reading in 8K chunk is not the best approach for you.

Now you have the bytes to write to the response. Next step is to
cache it and then deliver it.


image

Now the two functions that you have seen several times and have
been wondering what they do. Here they are:


image

WriteResponse has no tricks, but
ProduceResponseHeader has much wisdom in it. First it turns
off response buffering so that ASP.NET does not store the written
bytes in any internal buffer. This saves some memory allocation.
Then it produces proper cache headers to cache the file in browser
and proxy for 30 days, ensures proxy revalidate the file after the
expiry date and also produces the Last-Modified date from
the file’s last write time in UTC.

How to use it

Get the HttpCompressionModule and
StaticFileHandler from:

http://code.msdn.microsoft.com/fastmvc

Then install them in web.config. First you install the
StaticFileHandler by removing the existing mapping for
path=”*” and then you install the HttpCompressionModule.


image

That’s it! Enjoy a faster and more responsive ASP.NET MVC
website deployed on IIS 6.0.

Share this post : del.icio.us digg dotnetkicks furl live reddit spurl technorati yahoo

ensure – Ensure relevant Javascript and HTML are loaded before using them

ensure allows you to load Javascript, HTML and CSS
on-demand, whenever they are needed. It saves you from writing a
gigantic Javascript framework up front so that you can ensure all
functions are available whenever they are needed. It also saves you
from delivering all possible html on your default page (e.g.
default.aspx) hoping that they might some day be needed on some
user action. Delivering Javascript, html fragments, CSS during
initial loading that is not immediately used on first view makes
initial loading slow. Moreover, browser operations get slower as
there are lots of stuff on the browser DOM to deal with. So,
ensure saves you from delivering unnecessary
javascript, html and CSS up front, instead load them on-demand.
Javascripts, html and CSS loaded by ensure remain in
the browser and next time when ensure is called with
the same Javascript, CSS or HTML, it does not reload them and thus
saves from repeated downloads.

Ensure supports jQuery,
Microsoft ASP.NET AJAX and
Prototype framework. This
means you can use it on any html, ASP.NET, PHP, JSP page that uses
any of the above framework.

For example, you can use ensure to download
Javascript on demand:

ensure( { js: "Some.js" }, function()
{
SomeJS(); // The function SomeJS is available in Some.js only
});

The above code ensures Some.js is available before executing the
code. If the SomeJS.js has already been loaded, it executes the
function write away. Otherwise it downloads Some.js, waits until it
is properly loaded and only then it executes the function. Thus it
saves you from deliverying Some.js upfront when you only need it
upon some user action.

Similarly you can wait for some HTML fragment to be available,
say a popup dialog box. There’s no need for you to deliver HTML for
all possible popup boxes that you will ever show to user on your
default web page. You can fetch the HTML whenever you need
them.

ensure( {html: "Popup.html"}, function()
{
// The element "Popup" is available only in Popup.html
document.getElementById("Popup").style.display = "";
});

The above code downloads the html from “Popup.html” and adds it
into the body of the document and then fires the function. So, you
code can safely use the UI element from that html.

You can mix match Javascript, html and CSS altogether in one
ensure call. For example,

ensure( { js: "popup.js", html: "popup.html", css: "popup.css" }, function()
{
PopupManager.show();
});

You can also specify multiple Javascripts, html or CSS files to
ensure all of them are made available before executing the
code:

ensure( { js: ["blockUI.js","popup.js"], html: ["popup.html", "blockUI.html"], css: ["blockUI.css", "popup.css"] }, function()
{
BlockUI.show();
PopupManager.show();
});

You might think you are going to end up writing a lot of
ensure code all over your Javascript code and result
in a larger Javascript file than before. In order to save you
javascript size, you can define shorthands for commonly used
files:

var JQUERY = { js: "jquery.js" };
var POPUP = { js: ["blockUI.js","popup.js"], html: ["popup.html", "blockUI.html"], css: ["blockUI.css", "popup.css"] };
...
...
ensure( JQUERY, POPUP, function() {
("DeleteConfirmPopupDIV").show();
});
...
...
ensure( POPUP, function()
{
("SaveConfirmationDIV").show();
);

While loading html, you can specify a container element where
ensure can inject the loaded HTML. For example, you can say load
HtmlSnippet.html and then inject the content inside a DIV named
“exampleDiv”

ensure( { html: ["popup.html", "blockUI.html"], parent: "exampleDiv"}, function(){});

You can also specify Javascript and CSS that will be loaded
along with the html.

How ensure works

The following CodeProject article explains in detail how ensure
it built. Be prepared for a high dose of Javascript techniques:

http://www.codeproject.com/KB/ajax/ensure.aspx

If you find ensure useful, please vote for me.

Download Code

Download latest source code from CodePlex: www.codeplex.com/ensure

Share this post :

kick it on DotNetKicks.com