Synchronize File Date Time in multiple servers, solve IIS ETag problem

When you deploy the same website on multiple webservers, you end up having each file getting different last modified date. As a result, each IIS produces different ETag for the static files. If user is hitting different servers for the same file (due to load balancing), each IIS is responding with different ETag and thus browser downloading the same file over and over again. if you have 3 servers, same user has most likely downloaded the same file thrice. This gives poor page load performance.

Moreover, if you want to mirror two or more locations using one location as a base, not only you need to copy the same files but you need to set the same Create Date and Last Modified Date on the files. Otherwise they aren’t true mirror. There are various use cases where you need a complete mirror not only at file content level but also at file date time level.

Here’s a powershell script that will do the job for you:

# Path of the base folder. File date times in this folder is used as the base.
$SourceFolder = ".Folder1"
# Put all the other locations here. These locations must have the same folder structure as the base
$DestFolders = @('.Folder2', '.Folder3')

function sync($sourcePath, $destinationPath)
{
$sourceFiles = [System.IO.Directory]::GetFiles($sourcePath);
foreach ($sourceFileName in $sourceFiles)
{
$sourceFile = Get-Item $sourceFileName
$destFilePath = Join-Path -Path $destinationPath -ChildPath $sourceFile.Name
$destFile = Get-Item $destFilePath
if ($destFile.Length -eq $sourceFile.Length)
{
$destFile.LastWriteTime = $sourceFile.LastWriteTime;
$destFile.CreationTime = $sourceFile.CreationTime;

Write-Host ("SYNCED: " + $sourceFileName + " -> " + $destinationPath)
}
else
{
Write-Host ("SIZE DOES NOT MATCH: " + $sourceFileName + " -> " + $destinationPath)
}
}

$childFolders = [System.IO.Directory]::GetDirectories($sourcePath);
foreach ($childFolderName in $childFolders)
{
$childFolder = Get-Item $childFolderName
$destFolderPath = Join-Path -Path $destinationPath -ChildPath $childFolder.Name
$destFolder = Get-Item $destFolderPath
sync $childFolder.FullName $destFolder.FullName
}
}

$Source = Get-Item $SourceFolder
foreach ($destFolderName in $DestFolders)
{
$destFolder = Get-Item $destFolderName
sync $Source.FullName $destFolder.FullName
}

Open Source WPF UML Design tool

PlantUmlEditor is my
new free open source UML designer project built using WPF and .NET
3.5. If you have used plantuml before, you know
that you can quickly create sophisitcated UML diagrams without
struggling with a designer. Especially those who use Visio to draw
UML diagrams (God forbid!), you will be at heaven. This is a super
fast way to get your diagrams up and ready for show. You can
*write* UML diagrams in plain English, following a simple syntax
and get diagrams generated on-the-fly.

This editor really saves time designing UML diagrams. I have to
produce quick diagrams to convey ideas quickly to Architects,
Designers and Developers everyday. So, I use this tool to write
some quick diagrams at the speed of coding, and the diagrams get
generated on the fly. Instead of writing a long mail explaining
some complex operation or some business process in English, I can
quickly write it in the editor in almost plain English, and get a
nice looking activity/sequence diagram generated instantly. Making
major changes is also as easy as doing search-replace and
copy-pasting blocks here and there. You don’t get such agility in
any conventional mouse-based UML designers.

PlantUML editor screencast

I have submited a full codeproject article to give you a detail
walkthrough how I have built this. Please read this article and
vote for me if you like it.

PlantUML Editor: A fast and simple UML editor using WPF

http://www.codeproject.com/KB/smart/plantumleditor.aspx

You can download the project from here:

http://code.google.com/p/plantumleditor/

Is your computer running slow, battery running out quickly?

If your computer is running hot or battery running out quickly
then it is most likely due to some application or process consuming
high CPU or memory. If you keep running applications for a long
time, for example, Outlook, then it continues to grow in memory
consumption and does not free up memory efficiently. As a result,
your computer runs out of physical memory and other applications
run slower. Sometimes Outlook, browser, image editing applications
or some other application start taking full CPU as they get into
some heavy internal processing and make your CPU hot and other
applications perform slower.

My new CPUAlert is an
application that monitors CPU and memory consumption of
applications and alerts you if some application is consistently
taking high CPU or high memory. It not only saves your CPU and
Battery’s lifetime but also makes your computer run smooth
and let your active applications run as fast as they can be.

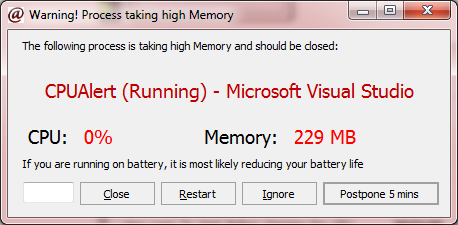
While it is running, if some process is consuming more than 200
MB memory, it will show you an alert:


image

Here you can see my Outlook is taking 244 MB of physical
RAM.

You can either postpone the alert for 5 mins (just press ESC),
or ignore the process permanently so that you no longer receive
alert for the process anymore, or you can close it and reclaim
memory.

The handy feature is “Restart” which closes the
application and starts again. This generally frees up memory that
clogs up in the process.

Same alert will come if some process is consuming more than 30%
CPU for over 5 mins.

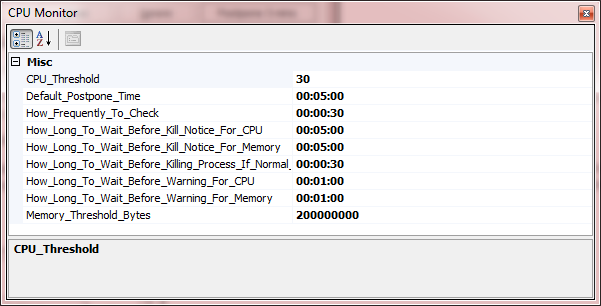
You can configure all these settings like what’s the
tolerable limit for CPU and memory, how frequently to show alert,
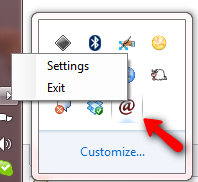
how long to wait before closing application etc by right clicking
on the Task bar icon and choosing Settings.


image


image

Source code of the project is available at:

http://code.google.com/p/cpualert/

The installer can also be downloaded from there.

Warning: The code is not in a good shape. I was frustrated at
some process taking high CPU and memory and I wrote this app within
hours to get the job done for me.

If you like the application, spread the word!

Windows 7 64bit works!

Windows 7 64bit finally works! This is the first 64bit OS I
could really use in my daily acitvities. I tried Vista 64bit, it
was unreliable. It would show blue screen right when I am about to
make a presentation to the CEO. Until Microsoft released SP1, Vista
64 bit was not usable at all. Then came Windows 7 beta. I
immediately tried the 64bit version of Windows 7 beta. It was even
worse than Vista. It would crash every now and then – waking
up from standby, trying to do livemeeting share, switching screens,
plugging in external USB drives and what not. So, I patiently
waited for the final version to come out before I get on installing
it on all my laptops. Happy to say, the final version works
perfectly on HP tx2000 Tablet PC, DELL Vostro 1500, DELL Inspiron
1520. Once you do a full windows update and install some drivers
here and there, it all works perfectly. And let me say, Windows 7
is beautiful. I found back the joy of working on computers
again!

Working on 64bit Operating System is challenging. You
don’t always find the right printer driver. Your cool
external USB speakers won’t work – even if it is made
by Microsoft. And above all, there’s that C:WindowsWinsxs
folder which keeps increasing forever. By the time I was done with
Vista 64bit (two years approx in business), my Winsxs folder was
staggering 26 GB eating up every bit out of my C: partition. I had
no choice but to format and start over. It seems like this folder
keeps copy of every single DLL version it ever sees. The more
windows update I do, the larger it gets. Now on a fresh new Windows
7 installation, after installing VS 2008, Office Applications,
Windows Live applications and some handy tools, the Winsxs folder
is 5.62 GB. Let’s see how it keeps growing over the year. A
useful information for 64bit wannabes, make sure your C partition
is at least 60 GB. I just installed Windows 7 64bit 3 days back and
it has already taken 31 GB space.


image

Since I am doing a totally useless post, let me sprinkle some
productivity tips on it before you lose interest reading my
blog.

I realized I do a lot of context swiching. I get over 200 mails
per day, so I pretty much switch focus from Visual Studio/Browser
to Outlook once every minute, which is big cencentration killer.
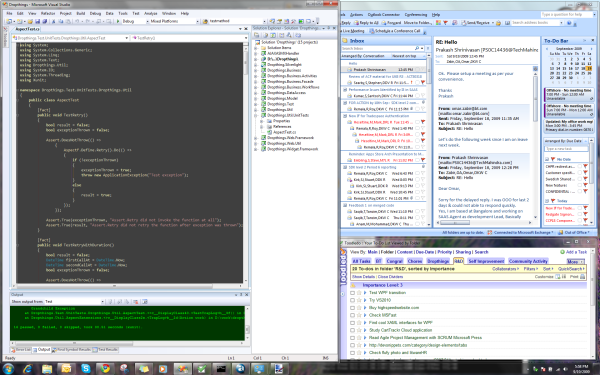
So, I tried the above setup on my 25” screen and it works
great!

The left half of the screen is visual studio and the right half
screen shows Outlook and my todolist. As you see, I can see the
emails coming up on Outlook without ever switching. The Visual
Studio screen width is the right size to read code without
horizontally scrolling. The right bottom half of the screen shows
my toodlist so that I am always doing the right task from my
todolist and not wondering around heedless. If I browse, I bring up
the browser on top of the Visual Studio and keep the right half
same so that while browsing I am not missing important mails and I
still have an eye on my next actions.

I have been using Toodledo for a year. I love it! It has a geat
iPhone app which is the only reason I use Toodledo and not other
alternatives. The ajax interface is slick, especially when you use
Google Chrome to make an application out of it on your desktop. You
can turn on keyboard shortcuts and then the toodledo inside Google
Chrome’s application like view becomes the best web based
todolist application out there. Whenever I file a task, I hit
‘n’, enter the task title, press tab, 1/2 for priority,
hit enter and I am done. How convenient! Especially when I read
mails and file actionable tasks at least 40 to 60 times per
day.